
Setting up ASP.NET social identity providers isn't exactly 100% straight-forward. The documentation is pretty vague. A couple years ago I wrote a walkthrough guide for setting up Microsoft Account authentication provider for ASP.NET 4.*. Now that the release of ASP.NET Core 1.0 is just around the corner, I've started getting requests for a similar walkthrough guide for ASP.NET Core Authentication using Microsoft Accounts.
Ask and you shall receive.
Here's the walkthrough using Visual Studio 2015, ASP.NET Core, and the Microsoft Account social identity provider.
Step #1: Create a Project
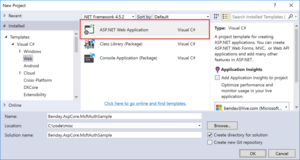
Open Visual Studio 2015. Click New Project. Choose ASP.NET Web Application as the project type. Enter the project name and solution name. Click OK.
Step #2: Create the ASP.NET Core MVC Project
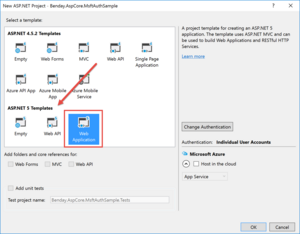
You should now see a dialog that says New ASP.NET Project. In the Select a template box, scroll down until you see ASP.NET 5 Templates. NOTE: the name for this section will eventually change as ASP.NET Core gets its official rename from ASP.NET 5. Choose Web Application. Click OK.
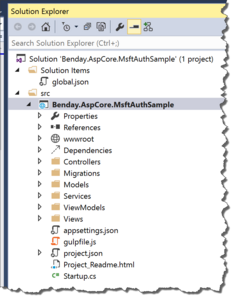
When the project creation wizard has completed, you should see the new solution and project in Solution Explorer.
Step #3: Open the NuGet Package Manager
When you create a new ASP.NET Core project, it has a lot less stuff added to the project than you would have gotten if it were an ASP.NET 4 project. The idea is that all the non-essential stuff has been pulled out. This means that anything that you need beyond the basics has to be added back in. This includes the code for doing authentication using Microsoft Accounts (or Facebook accounts or Twitter accounts). We're going to pull this code in from NuGet.
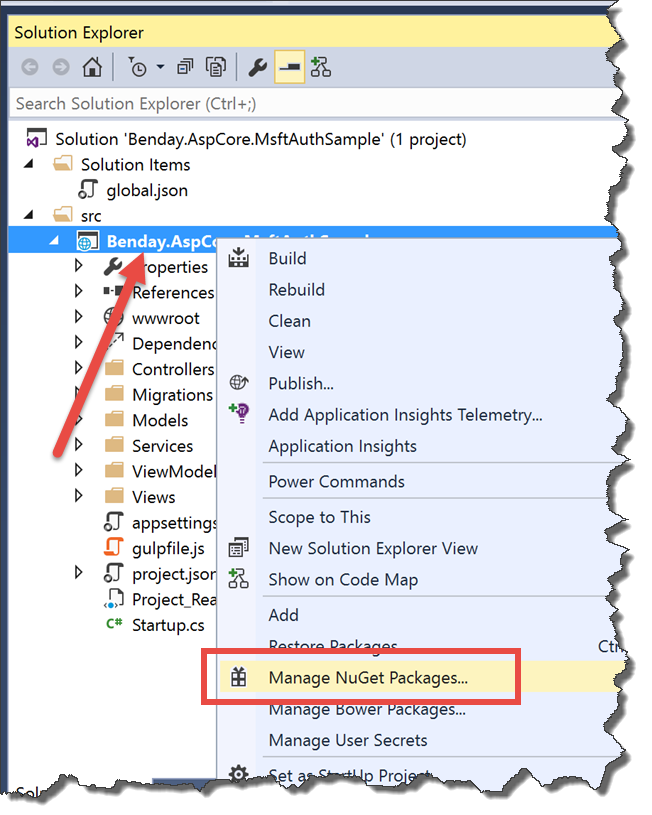
In Solution Explorer, right-click on the project name node and choose Manage NuGet Packages from the context menu. 
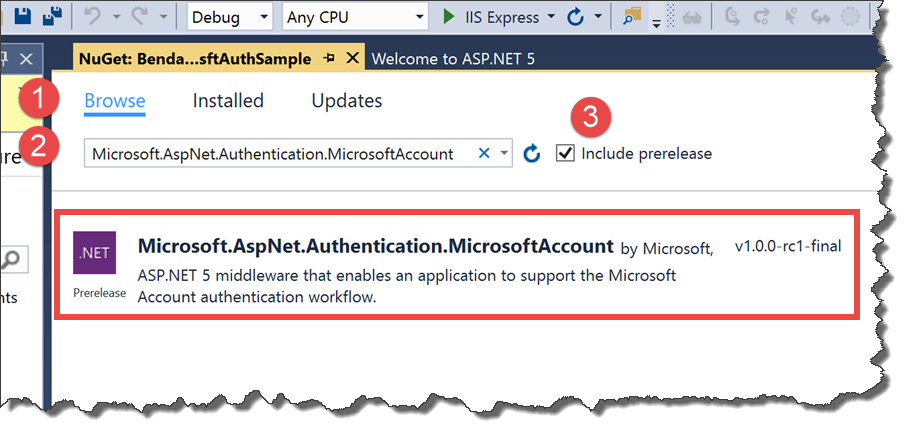
Step #4: Add the NuGet Package for Microsoft Account Authentication
You should now see the NuGet Package Manager window for your project. Click Browse. In the search box, type Microsoft.AspNet.Authentication.MicrosoftAccount. If you're going through this before ASP.NET Core has been released, you'll probably need to check Include prerelease in order to find the appropriate package. Select Microsoft.AspNet.Authentication.MicrosoftAccount in the search results. 
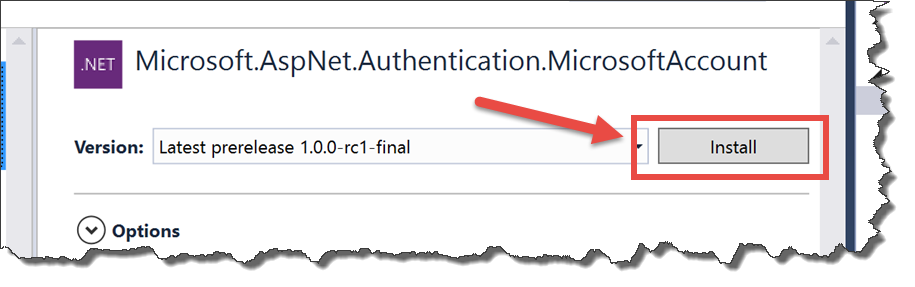
After you click the package in the search results, you'll see a new panel with the package details. Click the Install button to add the package to your project.
Step #5: Add code for Microsoft Account authentication to Startup.cs
Now that the NuGet package has been added, you'll need to add the code for the Microsoft Account authentication to the Configure() method in Startup.cs.
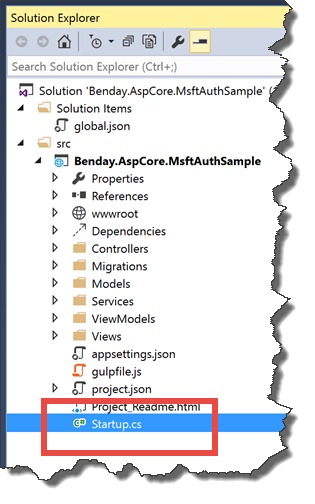
In Solution Explorer, locate Startup.cs. Double-click Startup.cs to open it. 
You should now see the code editor for Startup.cs. Locate the Configure() method. In this method, find the line that says app.UseIdentity(); and then add the following code.
app.UseMicrosoftAccountAuthentication(options =>
{
 options.ClientId = "{client id}";
 options.ClientSecret = "{client secret}";
});
When you're done adding the code, it should look like the following image.

Step #6: Create a Client ID and Client Secret for Microsoft Authentication
Right now that code has two placeholder values in it: and . These two values are the values that are used to securely communicate with the Microsoft Account authentication services.
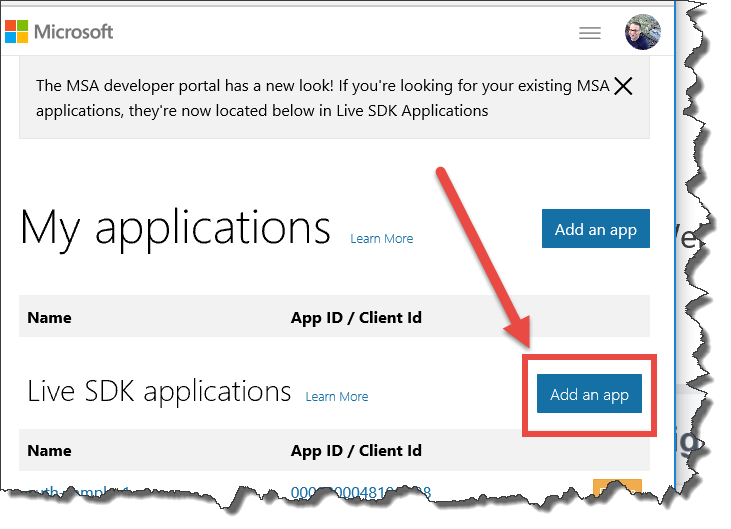
To create these values, open a browser and navigate to https://apps.dev.microsoft.com/?mkt=en-us#/appList. You should see the list of apps in your account.
Under Live SDK applications, click Add an app. 
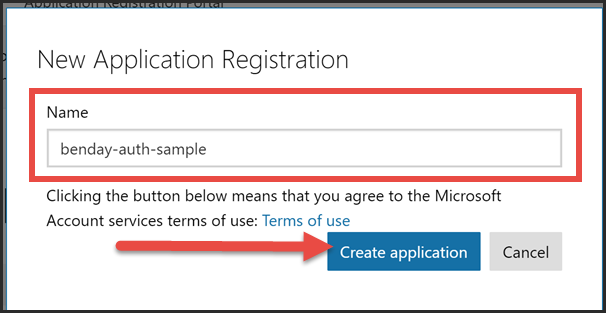
You should now see the New Application Registration dialog. Enter the name that you'd like to use to describe your application and click the Create application button.
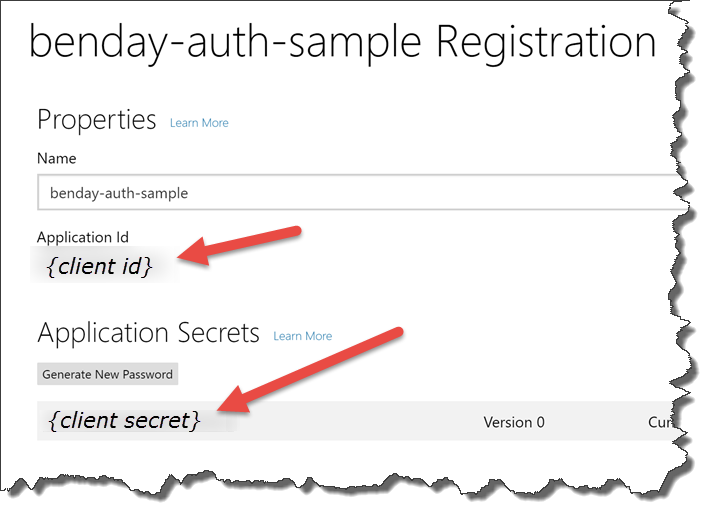
You should now see the details for your new application. The two values that we need to plug back into Startup.Configure() are on this page. And just to make it confusing, the NuGet package for Microsoft Authorization uses different names than what shows up on the details page for your application. The Application Id value becomes Client Id and Application Secrets becomes Client Secret. Grab those two values as shown in the screenshot and remember them for later. 

Step #7: Specify URLs for your application
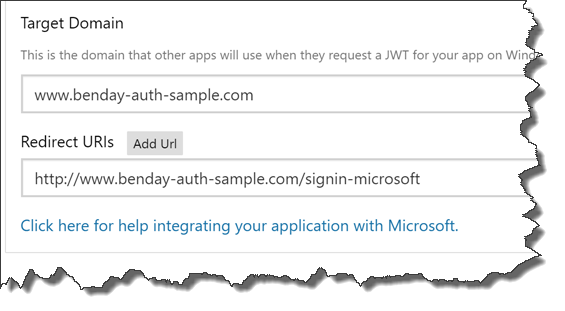
On the application registration details page, scroll down to the Platforms section. You'll need to provide two values that will be used to communicate with your application: Target Domain and Redirect URIs.
The target domain value is the host name for your application. In my sample, I'm using www.benday-auth-sample.com. If you only want to run this on your local machine, don't worry. Just type a unique web address and we'll take care of the details later in this guide.
Enter the host/domain name that you want to use in the Target Domain box. In the Redirect URIs box, enter the URL that will be used as the re-entry point for users after they've successfully authenticated with their Microsoft Account. The value you'll use for ASP.NET Core is http:///signin-microsoft.
Scroll to the bottom of this page and click Save.
Step #8: Add Client Id and Client Secret to the ASP.NET Core Application
Go back to Visual Studio. You should have the Startup.cs file open and you should be in the Configure() method. Plug the values from and in to the UseMicrosoftAccountAuthentication method call.
Step #9: Restart Visual Studio as an Administrator
Before you can debug this in Visual Studio, you'll need to change the debugging host name in the ASP.NET Core project properties to use whatever value you chose as your Microsoft Authentication Target Domain value. Before you can change this, you'll need to re-start Visual Studio to run as an Administrator.
Close Visual Studio.
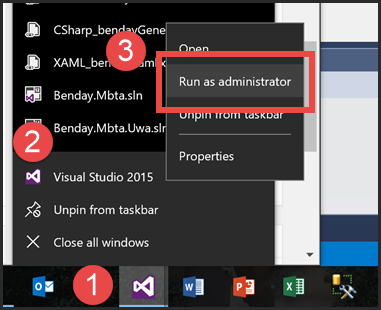
If you have Visual Studio pinned to your Windows task bar like I do, here are the steps to start Visual Studio as an Administrator. It's a little bit confusing because you have to deal with several different context menus in a row. 1) In the task bar, right-click the program icon for Visual Studio to bring up the context menu. 2) Right-click the Visual Studio 2015 icon in the context menu. 3) Choose Run as administrator from the final context menu.
Step #10: Update ASP.NET Core Project Properties for Debugging
Now that Visual Studio is running as an administrator, re-open your ASP.NET Core solution (*.sln).
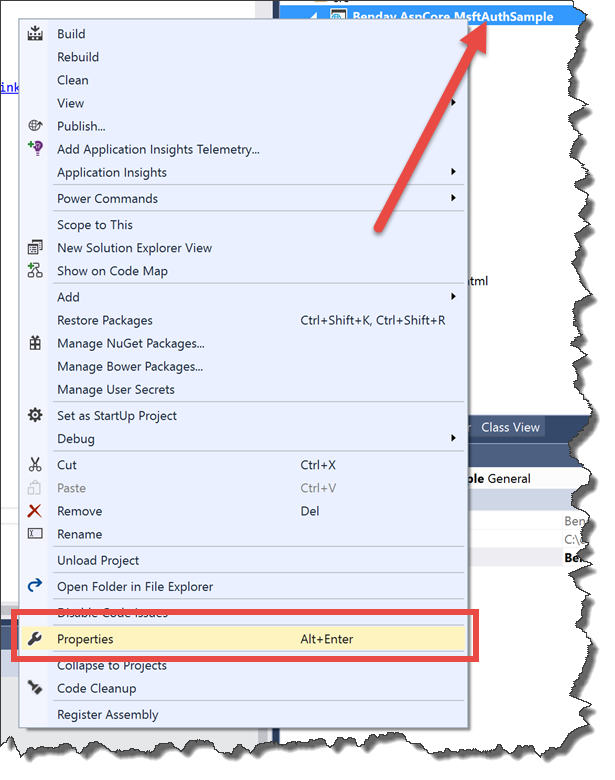
In Solution Explorer, right-click the ASP.NET Core project node, and choose Properties from the context menu.
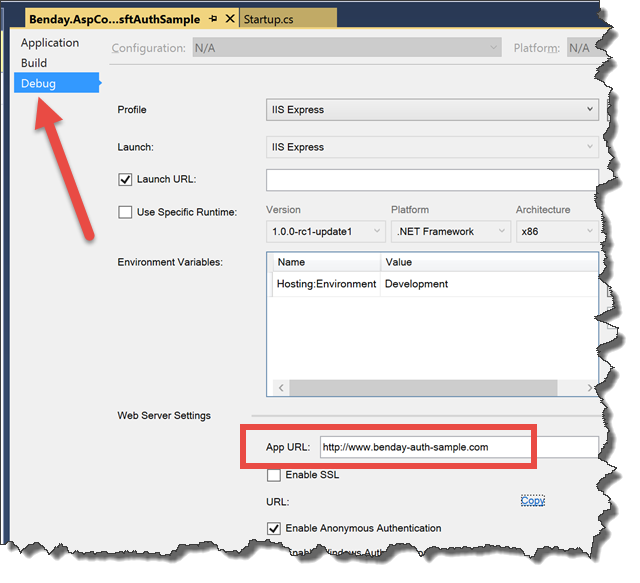
You should now see the project properties editor.
Click on the Debug tab. Locate the Web Server Settings values. Set the App URL value to the value that you used for your Target Domain in Step #7. Type CTRL-S to save your changes.
Step #11: Add an entry to the hosts file your host name
At the moment, if you go to run this application, it'll fail because your value probably doesn't resolve to your local machine via DNS. This is easily fixed by updating the Windows hosts file.
Open notepad.exe as an Administrator. (Hint: to open Notepad as an administrator, follow the same steps you used in Step #9 for Visual Studio but just substitute Notepad.)
At this point, you should see Notepad and it should be running in Administrator mode.
Using the File-->Open menu, navigate to the c:\windows\system32\drivers\etc\ folder and open the hosts file.
Scroll to the bottom of the hosts file. Add a new line that maps 127.0.0.1 to your value. Your value should be something like
127.0.0.1 www.benday-auth-sample.com
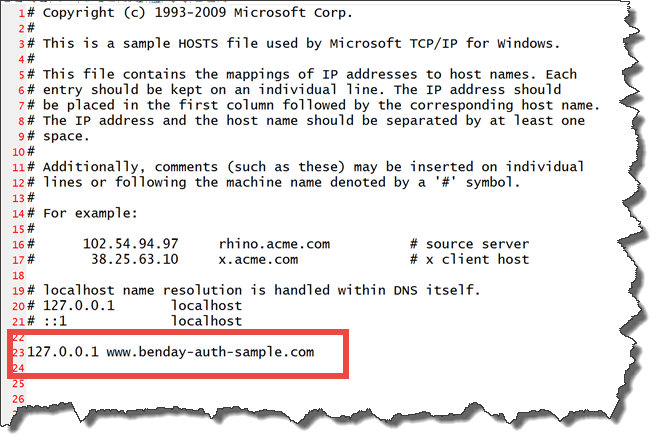
Save your changes to the hosts file and exit notepad.
Step #12: Run the app
Go back to Visual Studio and run the application.
Step #13: Log in using Microsoft Authentication
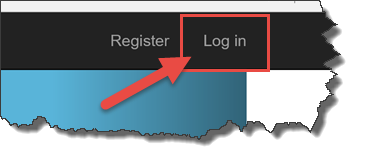
You should now see your application running in the browser. In the upper right corner of the screen, click Log in.
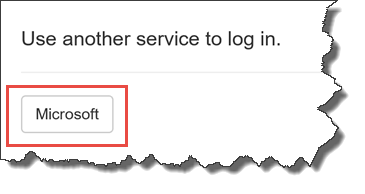
On the login page, you should see a section that says Use another service to log in and one of the options should be Microsoft. Click the Microsoft button. 
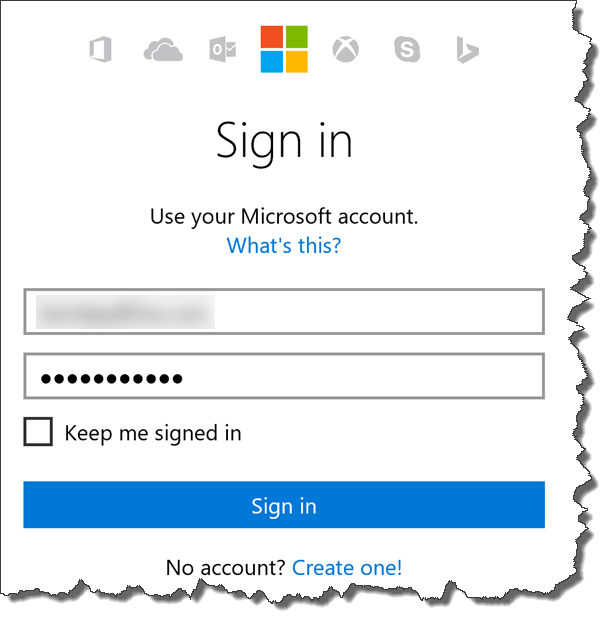
You should now see the Sign in page. Enter the user name and password for your Microsoft account and click Sign in. 
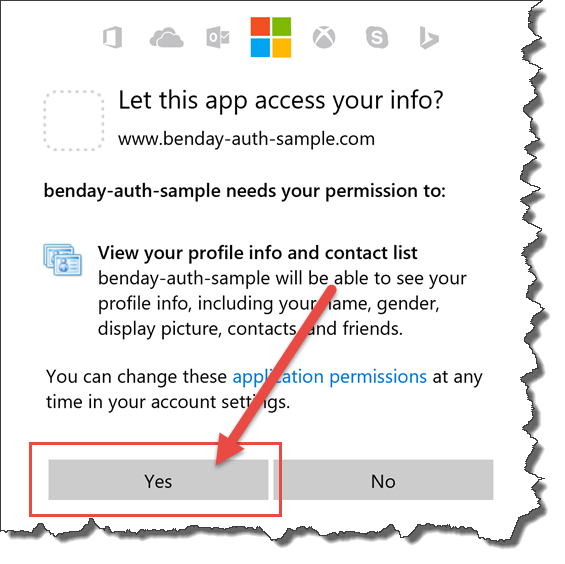
If this is your first time logging in to this application, you'll almost definitely be prompted to authorize access to your Microsoft Account information. Click Yes.

Step #14: Fix database problems
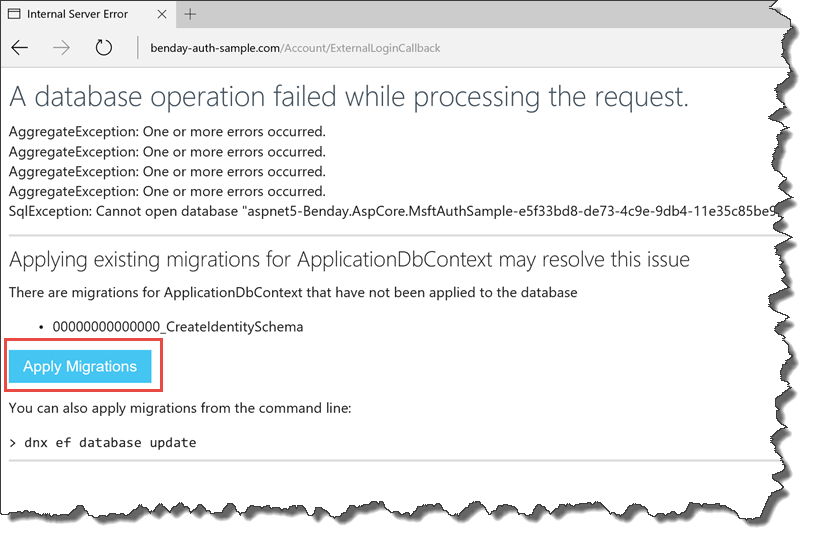
If you haven't already set up the security database for this project, you're probably looking at an error page right now. The error probably says something like
A database operation failed while processing the request.
AggregateException: One or more errors occurred.
SqlException: Cannot open database "aspnet5-Benday.AspCore.MsftAuthSample-e5f33bd8-de73-4c9e-9db4-11e35c85be99" requested by the login. The login failed. Login failed for user 'TURINO\benda'.
Applying existing migrations for ApplicationDbContext may resolve this issue
There are migrations for ApplicationDbContext that have not been applied to the database •00000000000000_CreateIdentitySchema
Click the Apply Migrations button.
After the database migrations have been run, your database should be set up and you should see something that says Migrations Applied -- Try refreshing the page.

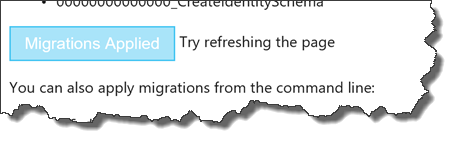
Refresh the page. If the refresh doesn't work, then start over at the click Log in link for your application.
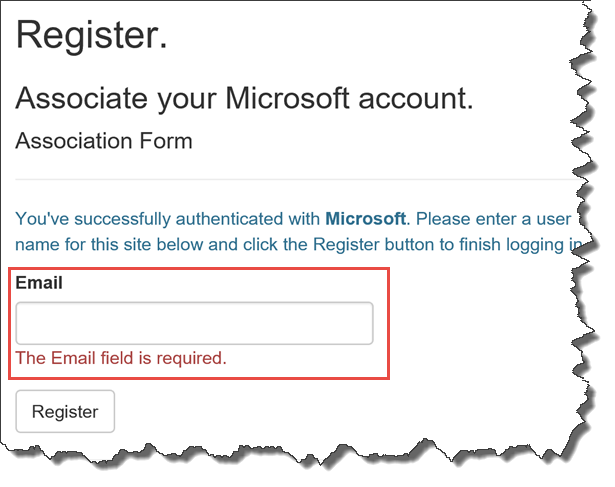
Step #15: Associate your account
You should now see the Associate your Microsoft account page.
Enter the email address that you want to use and click Register. 
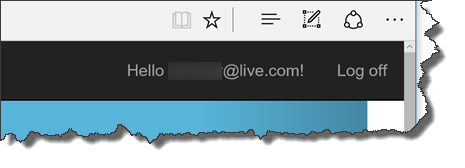
Step #16: You're logged in!
At this point, you're logged in to your app using your Microsoft Account and you should see your email address in the upper-right corner of the page along with the Log off button. You're done!
I hope this helped!
-Ben
-- Looking for help making the transition from ASP.NET to ASP.NET Core? Want to integrate your ASP.NET Core apps into your existing DevOps process? Need help getting going with DevOps in general? We can help. Drop us a line at info@benday.com.