
Here's a walk-through on how to create a new solution that uses an ASP.NET Core project, an MSTest unit test project, and Entity Framework Core 1.1 (EFCore1.1). I'm not sure if you've found this to be the case but I've been struggling with the documentation for a few days trying to figure out how to get EF Core Migrations working with the "dotnet ef" command line. This sample will show you how to do all of this with the current version of the .NET Core SDK.
(TL;DR: Do you want to just skip to the end and see the finished code? You can download the completed sample code from here.)
For this walk-through I'm going to use the solution name of "Benday.EfCore".
Step 1: Create the Solution & Projects
A few days ago, I blogged about how to create a solution and project structure entirely from the command line. We'll start by using my create script from that blog post.
Open a command prompt. Navigate to the directory by calling 'cd'.
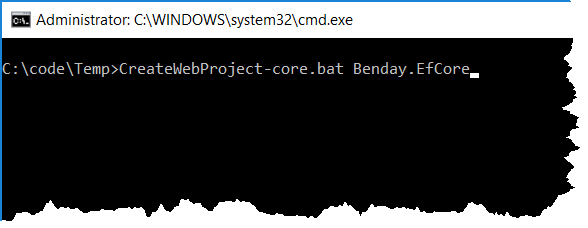
Type "CreateWebProject-core.bat Benday.EfCore" and press Enter to create the solutions and projects.
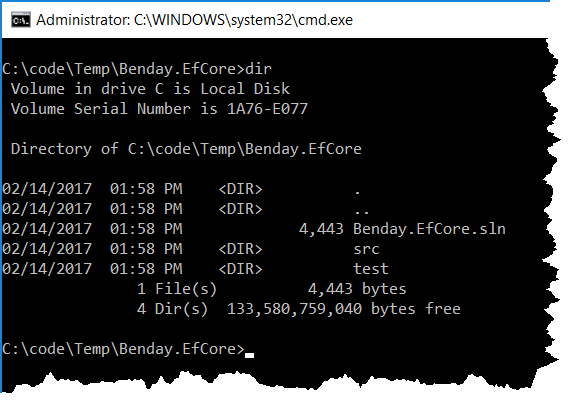
If you do a "dir" in this directory, you should now see a solution file, a folder named src, and a folder named test.
Step 2: Add NuGet Packages for EF Core 1.1 with SQL Server
Now you need to add the NuGet packages that make EF Core 1.1 work with SQL Server. You'll need to add "Microsoft.EntityFrameworkCore.SqlServer" to the unit test project, the class library (back end API) project, and to the ASP.NET Core MVC project. To enable Entity Framework Core Migrations in the class library API project, you'll need to add a reference to the "Microsoft.EntityFrameworkCore.Design" package.
Adding NuGet package references to a csproj is done using the "dotnet add package" command.
In the command prompt window, make sure that you've CD'd to the same directory that contains the Benday.EfCore.sln file. Run the following commands:
dotnet add .\src\Benday.EfCore.Api\Benday.EfCore.Api.csproj package Microsoft.EntityFrameworkCore.SqlServer dotnet add .\src\Benday.EfCore.Api\Benday.EfCore.Api.csproj package Microsoft.EntityFrameworkCore.Design dotnet add .\src\Benday.EfCore.WebUi\Benday.EfCore.WebUi.csproj package Microsoft.EntityFrameworkCore.SqlServer dotnet add .\test\Benday.EfCore.Tests\Benday.EfCore.Tests.csproj package Microsoft.EntityFrameworkCore.SqlServer
Step 3: Run Package Restore & Build
The packages for each project should be configured. Now, you'll download the dependencies and run a trial compilation.
In the command prompt window, run the following commands:
dotnet restore dotnet build
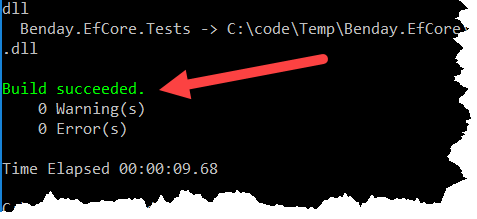
You should see a message that says that the build succeeded.
Step 4: Enable the dotnet ef Command
Before EF Core, you used to add EF migrations using the Package Manager window. While you can still do it this way, it's easier to do it from the command prompt using the "dotnet ef" command. To enable the "dotnet ef" command, you need to add the "Microsoft.EntityFrameworkCore.Tools.DotNet" package as a tool in the API class library project. This is different from just adding it in as a NuGet package reference -- in fact, you won't technically be adding it as a package reference at all.
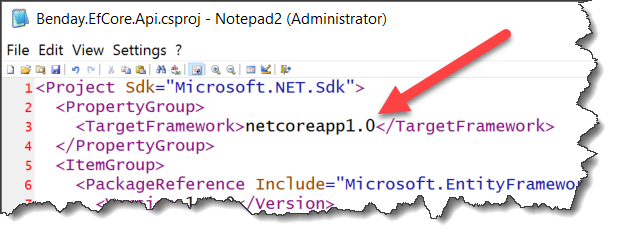
Here's where it's a little bit weird. You're going to have to edit the Benday.EfCore.Api.csproj file directly in a text editor. Yah. I know. That seems nutty. I suspect that adding a tool to a project will eventually show up as a feature in the dotnet utility. But for now, you're editing it by hand.
Using a text editor, open Benday.EfCore.Api.csproj. It's located in the .\src\Benday.EfCore.Api directory.
notepad .\src\Benday.EfCore.Api\Benday.EfCore.Api.csproj
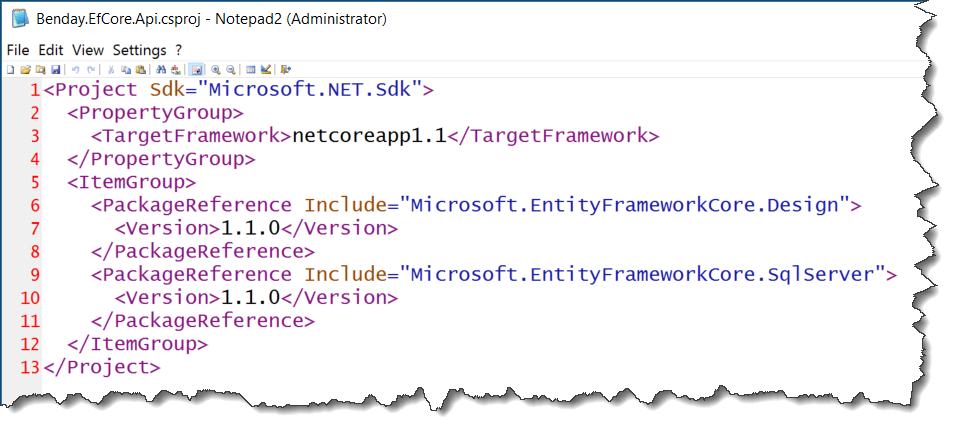
You should see the contents of Benday.EfCore.Api.csproj and it should look something like the image below.
Now that you have that open, you'll add a new ItemGroup to the just before the tag that has a DotNetCliToolReference element that points to Microsoft.EntityFrameworkCore.Tools.DotNet.
Here's the XML that you'll add:
<ItemGroup>
 <DotNetCliToolReference
 Include="Microsoft.EntityFrameworkCore.Tools.DotNet"
 Version="1.0.0-msbuild3-final" />
</ItemGroup>
When you're finished editing, it should look like the image below.

Save your changes and close the text editor.
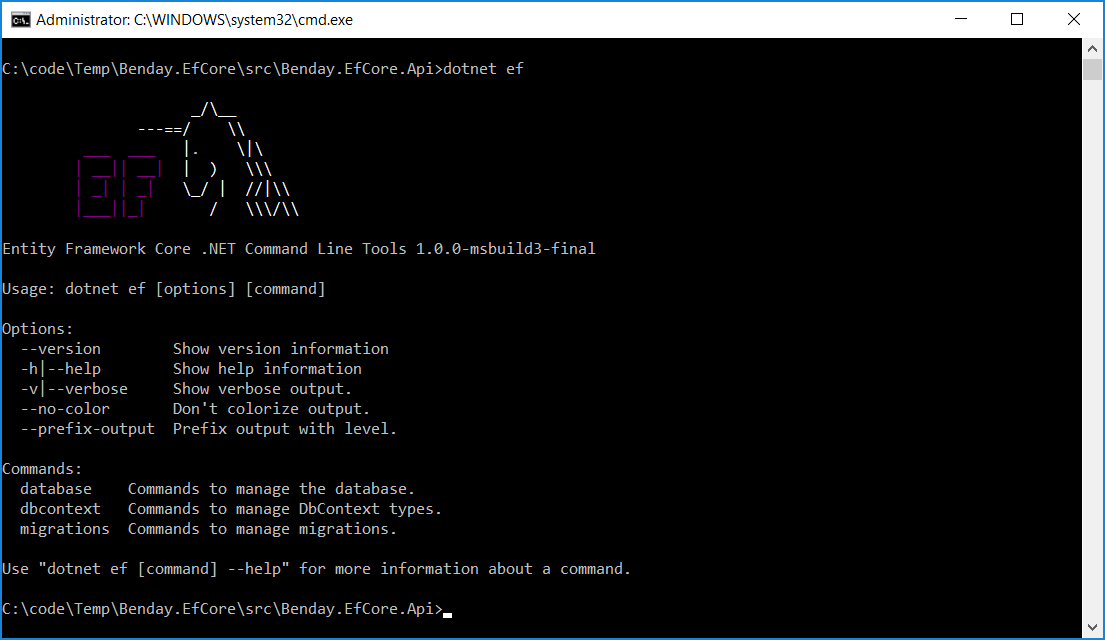
Step 5: Run "dotnet restore" & Verify That "dotnet ef" Works
Those changes that you made should have just enabled the "dotnet ef" tool for that API project.
In the command prompt window, run "dotnet restore" to download the packages and tools.
Use CD to navigate to the "src\Benday.EfCore.Api" folder.
Run "dotnet ef"
You should see a screen that looks like the one below.
Step 6: Add a DbContext and a Model
Now you'll actually implement a little code.
In the "Benday.EfCore.Api" directory, open Class1.cs using a text editor and add the following code:
using Microsoft.EntityFrameworkCore;
using System;

namespace Benday.EfCore.Api
{
 public class MyDbContext : DbContext
 {
 public DbSet<Person> Persons { get; set; }

protected override void OnConfiguring(DbContextOptionsBuilder optionsBuilder)
 {
 // make sure the connection string makes sense for your machine
 optionsBuilder.UseSqlServer(@"Server=(local);Database=EfCoreSample;Trusted_Connection=True;");
 }
 }

 public class Person
 {
 public int Id { get; set; }
 public string FirstName { get; set; }
 public string LastName { get; set; }
 public string Status { get; set; }
 }
}
Save the changes and close the text editor.
Step 7: Add an Entity Framework Core Migration
Ok. You've got some code ready and at this point, you can create an EF Core migration to your project that will create the database for your project.
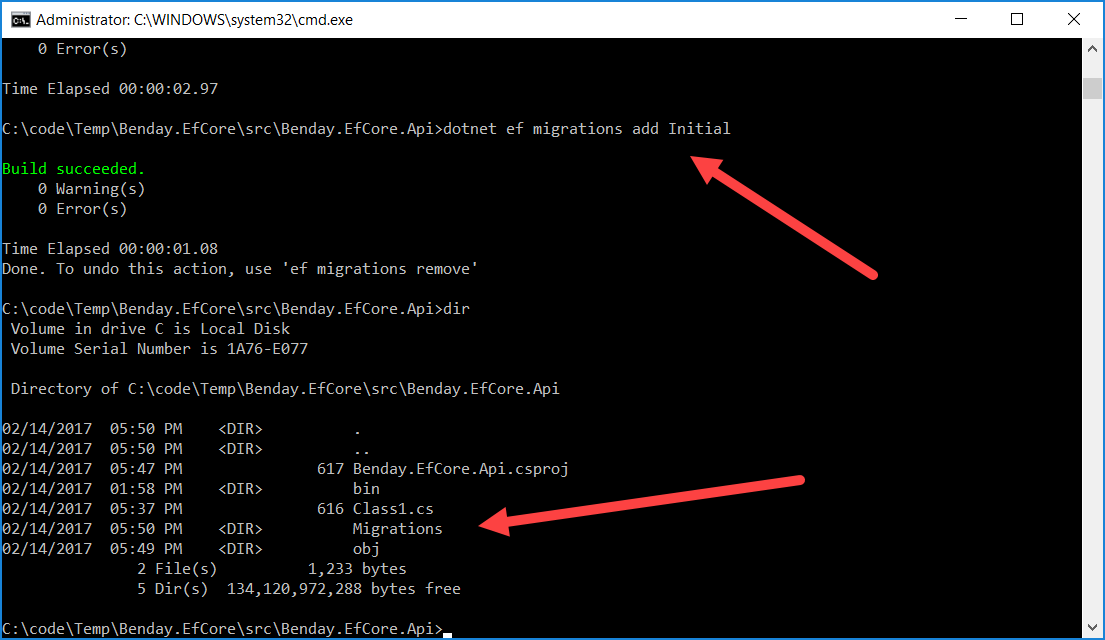
In the command prompt window, build the project by running the "dotnet build" command. The build should succeed.
Next, you'll use "dotnet ef" to add a migration. Run the following command:
dotnet ef migrations add Initial
If that worked, then CONGRATULATIONS! But it probably didn't work because there's a bug in the current version of the tools. (Sigh.)
Step 7b: Modify the csproj as a Workaround
Did you get an error message when you tried to add that migration that said it could not load file or assembly System.Diagnostics.DiagnosticSource?
System.IO.FileLoadException: Could not load file or assembly 'System.Diagnostics.DiagnosticSource, Version=4.0.1.0, Culture=neutral, PublicKeyToken=cc7b13ffcd2ddd51'. The located assembly's manifest definition does not match the assembly reference. (Exception from HRESULT: 0x80131040) File name: 'System.Diagnostics.DiagnosticSource, Version=4.0.1.0, Culture=neutral, PublicKeyToken=cc7b13ffcd2ddd51' at Microsoft.EntityFrameworkCore.Infrastructure.RelationalServiceCollectionExtensions.AddRelational(IServiceCollection services) at Microsoft.Extensions.DependencyInjection.SqlServerServiceCollectionExtensions.AddEntityFrameworkSqlServer(IServiceCollection services) at Microsoft.EntityFrameworkCore.Internal.ServiceProviderCache.<>c__DisplayClass4_1.
If you got the error, here's a hack to work around the bug. You're basically going to *temporarily* change the Benday.EfCore.Api project to target an older version of .NET Core. [UPDATE 3/14/2017: Here's another workaround that is about 100% less awful.]
Using a text editor, open Benday.EfCore.Api.csproj.
Near the top of the file, you should see a line that says "
Close the file. Run "dotnet restore" then run "dotnet build". Now, re-run the add migration command.
dotnet ef migrations add Initial
The add migration command should come back without any errors and say "Build succeeded". You should now have a new directory called Migrations that contains your migration files.
Step 8: Deploy Your Database
Now that you have your EF Core migration set up, you can deploy the schema to your database using the "dotnet ef" tool.
Run the following command:
dotnet ef database update
It might take about 10 seconds to run this command (and it might not look like it's doing anything) but when it's done, the database schema will be deployed to the database connection that you specified in MyDbContext.cs.
Step 9: Write Code to Your Heart's Content
At this point, you've done most of the tricky stuff. Next up, the hard part -- actually writing your application. In the sample code, I supplied a little unit test project and ASP.NET Core MVC project to exercise the MyDbContext and Person class.
Summary
You can download the full, completed sample here. The completed application has a simple unit test that saves a record to the database and also a simple web interface that saves/loads data from the database.
Enjoy.
-Ben
-- .NET Core got ya down? Need some DevOps magic for your Entity Framework code? Want to include ASP.NET Core in your TFS2017 DevOps Release Pipeline? We can help. Drop us a line at info@benday.com.