Here's a guide to walk you through the process of creating a build server on Windows Server Core. If you’re not already familiar with Windows Server Core, here’s a quick overview. Think of it as Windows Server 2016 with all the extra, unnecessary stuff pulled out. This means that it uses a lot less disk space and a whole lot less memory.
The minor downside is that you don’t get the pretty and helpful graphical user interface (GUI) that you’re used to. You get a command line window (cmd and PowerShell) and that’s about it.
Another way of thinking of this chapter is that it will walk you through how to install the TFS2018 / VSTS build agent using only the command line.
Since the command line is available on the full version of Windows, you can use these same steps to install the build agent on pretty much any version of Windows.
Verify the Download URL for the Build Agent Installer
You’ll need to do this step from a machine with a web browser. If you’re planning to install the Agent on Windows Core, then you’ll have to do this chunk of steps from a different machine.
Just to keep people guessing, Microsoft sometimes changes the URL for downloading the build agent bits. In order to make sure that you’re installing the latest version of the build agent, I’m going to walk you through how to get the URL for the latest version.
- Open a web browser
- Navigate to your TFS web interface. Depending on what security settings you chose, this is probably one of the following:
You should see a screen that looks like this.
On the right side of the menu bar, there is a gear icon.


- Click the gear icon to bring up the Settings menu
- Choose Agent Pools
You should now see the admin screen for you team project collection and you should be looking at the Agent Pools tab. There should be a button that says “Download agent”.
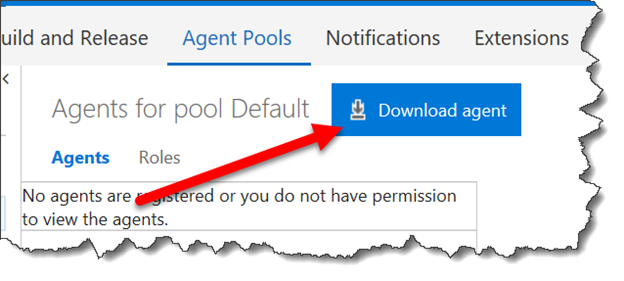
- Click the Download agent button
A dialog should pop up that shows you the download and installation info for Windows, Mac OS / OS X, and Linux.
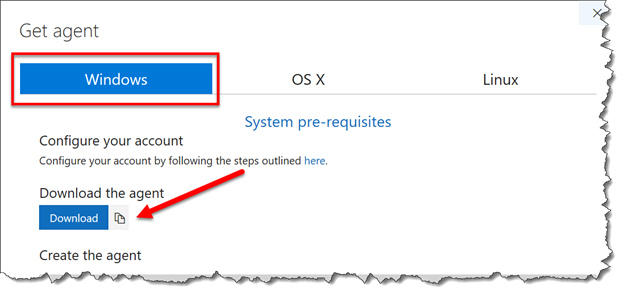
- Make sure the Windows tab is selected
- Click the “copy to clipboard” icon that is directly to the right of the Download button
The URL for the build agent download should now be in your clipboard. The value should look something like https://go.microsoft.com/fwlink/?linkid=858950. You’re going to need this value in a later step. Make sure that you don’t lose this value!
Create the Download & Extract Script
Next I’m going to walk you through the process of creating a PowerShell script to download the build agent zip and extract it. You might be wondering why I’m doing this. You’re probably thinking “why doesn’t he just simply open a browser and download the zip?” Well, the reason why is that there isn’t a browser on Windows Server Core and that means that downloading the agent installer zip is kind of tricky.
- Log in to your build server machine as a user with administrator rights
- Open notepad.exe
- Paste in the following script
$url = "https://go.microsoft.com/fwlink/?linkid=858950"

$toFilename = "$PSScriptRoot\agent.zip"

Invoke-WebRequest -uri $url -outfile $toFilename

$agentDir = "c:\agent"

if ((Test-Path $agentDir) -eq $false)
 {
 mkdir $agentDir
 }

cd $agentDir

Add-Type -AssemblyName System.IO.Compression.FileSystem

Write-Output "Starting to extract '$toFilename' to '$agentDir'..."
 [System.IO.Compression.ZipFile]::ExtractToDirectory($toFilename, "$PWD")

Write-Output "Agent has been extracted to '$agentDir'."

Write-Output ""

Write-Output "Run config.cmd to configure the agent."
- Verify that the url on line 1 of the script ($url’s value) is the same URL value that you copied to the clipboard
- Save the script to a file named download-agent-and-extract.ps1
Now that you have that script, it’s time to run it from PowerShell. But chances are pretty good that you’re looking at a command prompt window rather than a PowerShell window. That’s easy enough to fix.
- In the command prompt window, type powershell and press <enter>
Your window should look something like this next image.
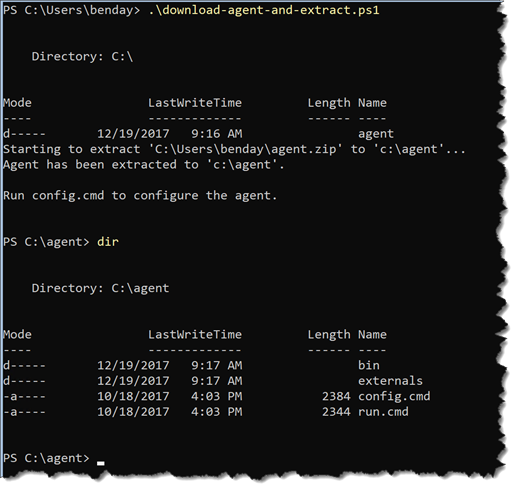
Let’s run the script.
- Type .\download-agent-and-extract.ps1 and press
NOTE: Did you get an error that says “An error occurred while sending the request”? Are you using a self-signed SSL certificate for TFS2018? If you followed the TFS install instructions and enabled SSL, you probably are using a self-signed SSL certificate. Check out this blog post for how to fix this. https://www.benday.com/2017/12/21/tfs-build-agent-fails-to-configure-with-tfs2018-self-signed-ssl-certificate/
When the command is done, you should not see any errors and the prompt should say “PS C:\agent>”. (NOTE: this might take a few minutes to run.)
Let’s verify that this extracted as expected.
- (Optional) To clear the screen, type “cls” and press Enter
- Type “dir” and press Enter
The screen should look something like the image above.
Configure the Agent
Now that the agent bits are deployed to disk, you’re ready to start configuring it. This guide assumes that you’re planning to run this agent in a Windows domain and that the TFS machine is in the same domain as the agent. I’m also assuming that you intend to run this agent as a service rather than as an interactive process.
Recommendation: The agent can be configured to run as NT AUTHORITY\NETWORK SERVICE but I think that this makes permissions management confusing when you’re creating and running builds. I strongly recommend that you run the agent as a service using a known service account that is based on an Active Directory user rather than one of the build-in service accounts like NETWORK SERVICE. This guide will assume that you’re following this recommendation.
You’re going to be prompted for a handful of values during the configuration process:
- TFS server URL: This is the same URL that you used to access the TFS web interface. By default this will be something like https://servername or http://servername:8080/tfs
- Authentication Type: By default, authentication is based on the service account’s Windows logon. This mode is called Interactive. In order support more complex scenarios and multiple platforms, there are also several other options. This guide will show you how to do Interactive mode.
- User name & password for the agent service: These are the credentials for the service. In my case, I’ve created an Active Directory user named “tfsbuild”. The fully qualified username for this user is “DEMO\tfsbuild”.
When you’ve got these values, you’re ready to run the config process.
- In the PowerShell window, type “.\config.cmd” and press Enter
When prompted, enter the following values.
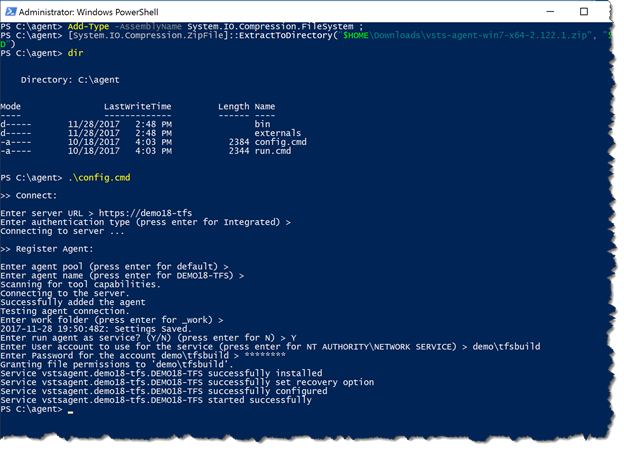
- “Enter server URL”: Type the URL for your TFS instance and click Enter
- “Enter authentication type (press enter for Integrated)”: Press Enter
- “Enter agent pool (press enter for default)”: Press Enter
- “Enter agent name (press enter for [local server name])”: Press Enter
- “Enter run agent as service? (Y/N)”: Type ‘Y’ and press Enter
- “Enter User account to use for the service”: Type the fully qualified name of the service account (example: demo\tfsbuild) and press Enter
- Enter Password for the account [service account]”: Enter the password for the service account and press Enter
When the config process has completed, you should see a message that says something like “Service vstsagent.demo17-tfs.DEMO17-BUILD started successfully”.
If you open the browser and go back to the Agent Pools tab for TFS, you should now see your new build agent in the list of Agents.
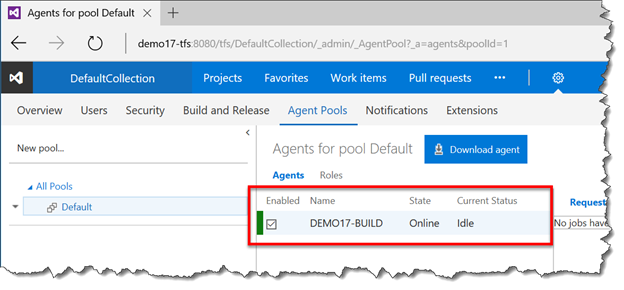
You’ve successfully configured a build agent on Windows Server Core.
I hope this helps.
-Ben
-- Looking for help with your TFS or VSTS build & release infrastructure? Do you have a whole lot of old XAML-based builds or Release Management 2013 releases that need to get upgraded? Not sure how to get going with DevOps, Continuous Integration, and Continuous Deployment? We can help. Drop us a line at info@benday.com.