Did you know that you can enforce code coverage as part of the pull request process in Azure DevOps? You can. And it's cool! But you probably wouldn't notice that the feature is available unless you really went hunting for it.
By default, pull request code coverage is enabled but set as optional. And if the code coverage check fails, you won't get a detailed error message and won't have any idea why it's failed.
In this article, I'll show you how to enable code coverage in your builds and pull requests, fix the error message problem so that you can see the results of the code coverage operation, and then also show you how to make code coverage required in a pull request.
What is Code Coverage?
When you're writing automated unit tests for your application code, you've got the test code and the application code. In a perfect world, you want to make sure that every line of code in your application is being exercised and validated by your automated tests. If every line has been exercised by your automated unit tests, you'd say that you have 100% code coverage.
Code coverage is a metric that tells you how well your automated tests are exercising the application code. If a line is executed as part of a test, that line is considered "covered".
Since code coverage is a metric to describe code quality and test quality, lots of teams use it as part of their Definition of Done (DoD). For example, code should have a minimum of 75% code coverage to be considered done.
How much code coverage should you have? What percentage code coverage do you need? The answer is up for debate. In my opinion, you want more code coverage rather less code coverage. 100% code coverage is probably overkill. 75% is probably a nice healthy level of code coverage. It takes a lot of effort to get to 100% coverage and squeezing the last bits of coverage out probably doesn't have a great ROI (return on investment). Additionally, 100% code coverage doesn't necessarily mean that your application actually works.
Pull Requests
If you're using Git, you probably are doing code reviews using Pull Requests. The idea with Pull Requests is that you do your development in a branch and when your feature is ready, you want to merge your changes from the feature branch back into the main branch. You could just merge those changes directly but if you want someone to review those changes and then perhaps have a conversation about those changes, you'll want to use a Pull Request.
In my mind, Pull Requests really should be called Merge Requests. You create a Pull Request in Azure DevOps (or GitHub) and then you have a place to have a conversation about what you've changed in the code. When you're done, you accept and complete the Pull Request and the changes get merged back to Main.
Enable Code Coverage as Part of an Automated Build Pipeline
If you are running your unit tests and capturing code coverage information, when you go to the build summary in Azure DevOps, you'll see information about the test results along with the latest code coverage percentage.
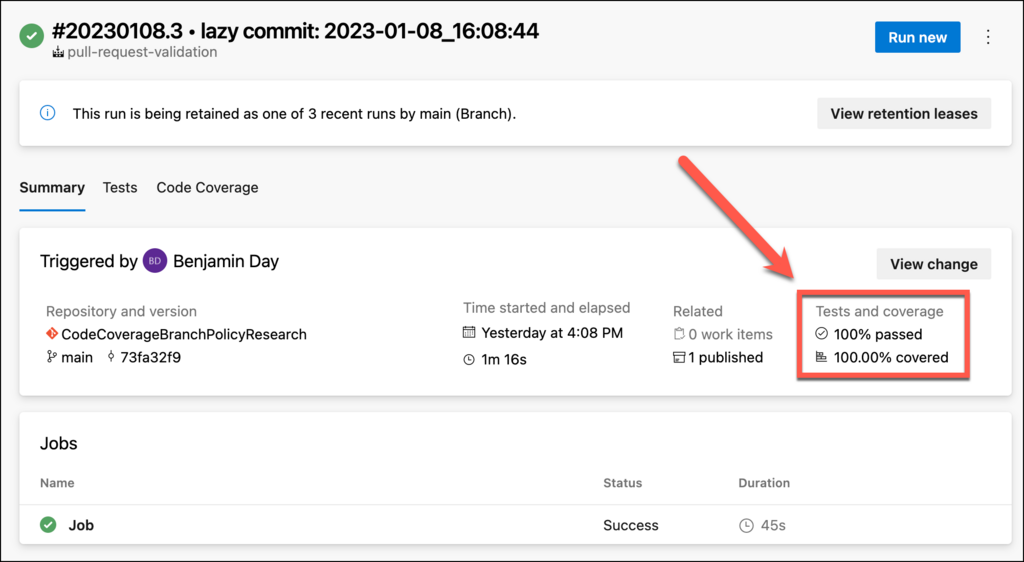
The results of an Azure DevOps Pipeline run with test info & code coverage info
To run unit tests and collect code coverage from your YAML Pipelines, edit your YAML to run the "dotnet test" command along with the argument
--collect:"Code Coverage".
- task: DotNetCoreCLI@2
  displayName: run unit tests
  inputs:
    command: 'test'
    projects: '**/HelloWorld.Tests.csproj'
    arguments: --collect:"Code Coverage"
Branch Policies as Part of Azure DevOps Pull Requests
That whole pull request flow that I described above probably sounds pretty manual. The developer has to create a pull request and a reviewer has to review it and approve it. Sounds like a lot of work.
Well, you can automate a LOT of stuff using Branch Policies. A very common branch policy is to require a particular build definition to run. As part of that build, you'll run your automated tests and with code coverage. When you do this, the code coverage features of Azure DevOps Pull Requests will automatically start working. In fact it can even get a little confusing because you might suddenly start seeing automated checks in your pull requests start failing.
For example in the image below you can see the failing code coverage checks in a pull request saying "Code coverage status check failed for ".
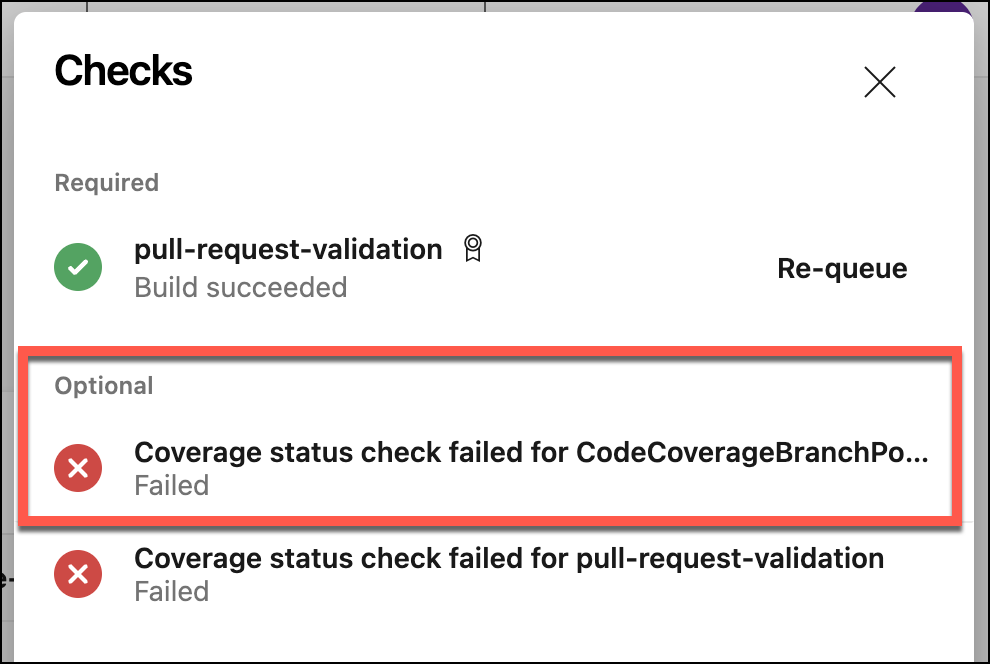
Code Coverage status checks in a pull request that are failing
Even more confusing is that the code coverage check is failing but it isn't showing you any information. What's the actual code coverage check error?!?!?!
Why Are the Pull Request Code Coverage Status Checks Failing?
Let's say that you're getting that code coverage failed check in your pull request. You look through the body of the pull request info and you see absolutely no hint as to why that code coverage check is failing.
There's an error saying that an optional check failed but where's the error message?!?!
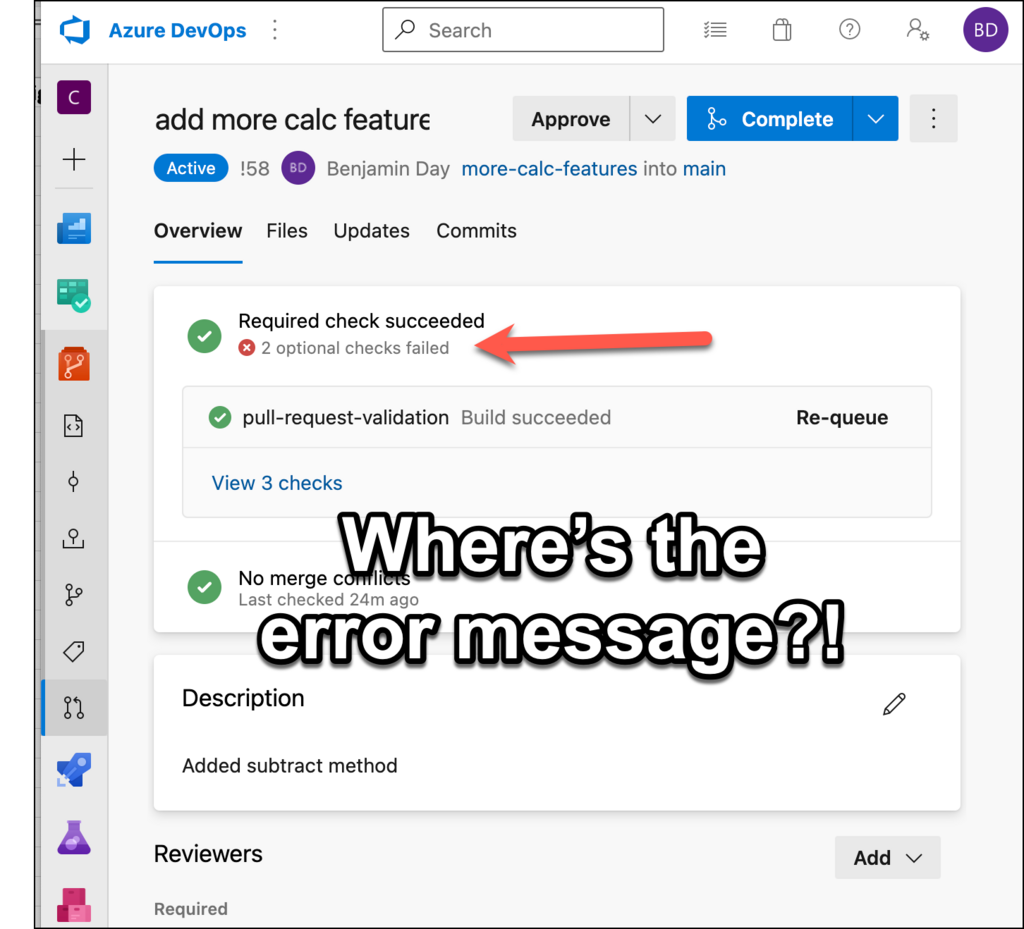
The coverage check failed but there's no error message
The reason it's failing is because of the default pull request settings in Azure DevOps.
Change the Azure DevOps Pull Request Settings using azurepipelines-coverage.yml
The default pull request code coverage settings for Azure DevOps are a little strange and not particularly user friendly. They're turned on and have a default required code coverage of 70%. That's good. But the setting for actually displaying the results of the coverage check is set to off.
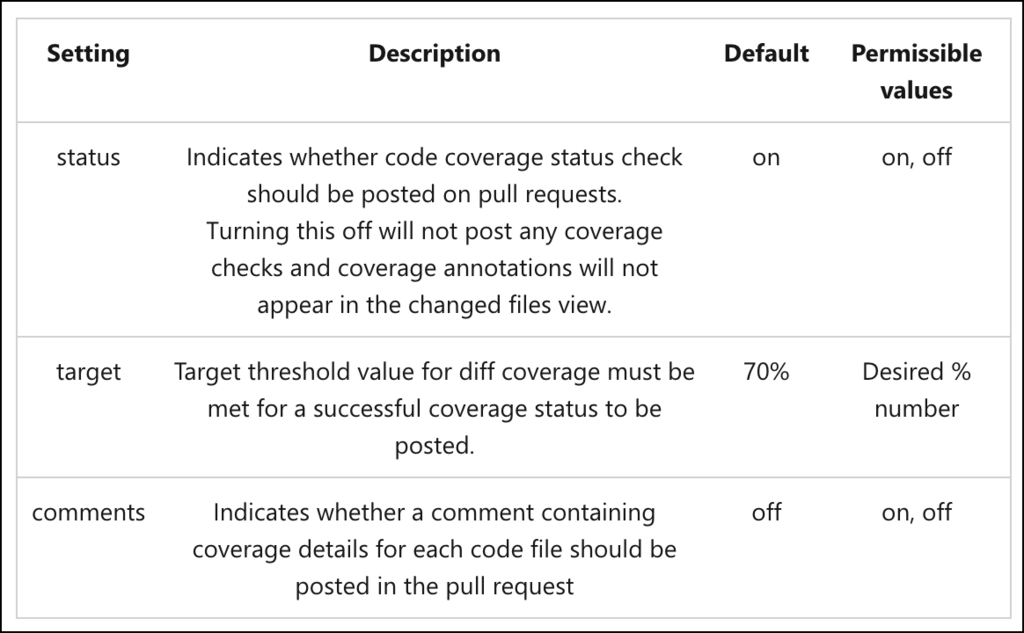
The Azure DevOps Pull Request Code Coverage Default Settings
Yeah. Weird, right? It'll check your code coverage automatically but it won't tell you anything the results.
The way to fix this is to add a file to the root of your Git Repository named azurepipelines-coverage.yml. Inside of that file, you'll paste the following YAML code. The important thing to notice is that the comments value is set to on.
coverage:
  status:
    comments: on
    diff:
      target: 80%
Add this to the main branch of the root of your git repo and re-run the checks in your pull request. NOTE: it's got to be in the main branch for this to work properly.
Understanding Why the Code Coverage Check is Failing
After the PR code coverage check runs, you'll still see that the check is failing but now you'll get a comment in your pull request that gives you the details of why it's failing.
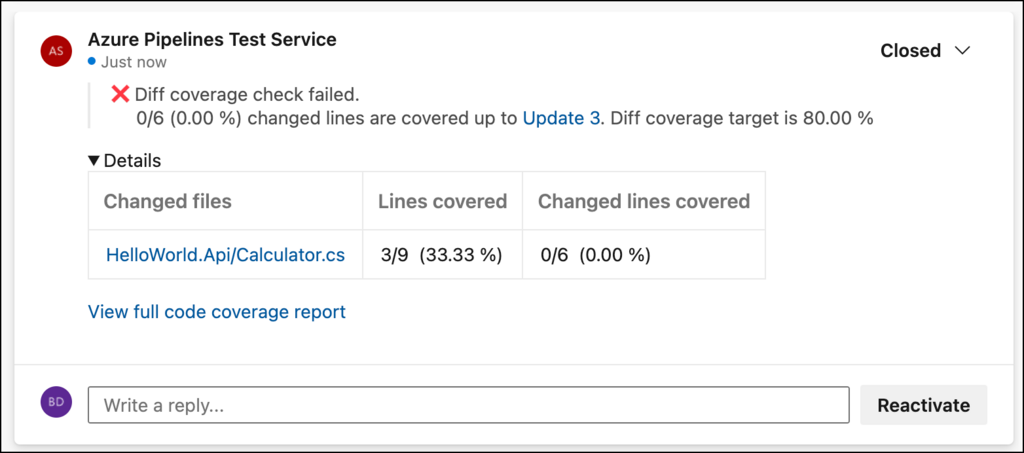
Code Coverage check on the pull request is failing and here are the details
In the case in the screenshot above, the author of the code has made changes to the Calculator class (Calculator.cs) that has a significant deficit in code coverage. To fix this, the author will need to add more tests for that un-covered code.
After adding more tests and pushing the changes back into the branch for the pull request, the checks will run again. This time you should see that the coverage check ran and passed.
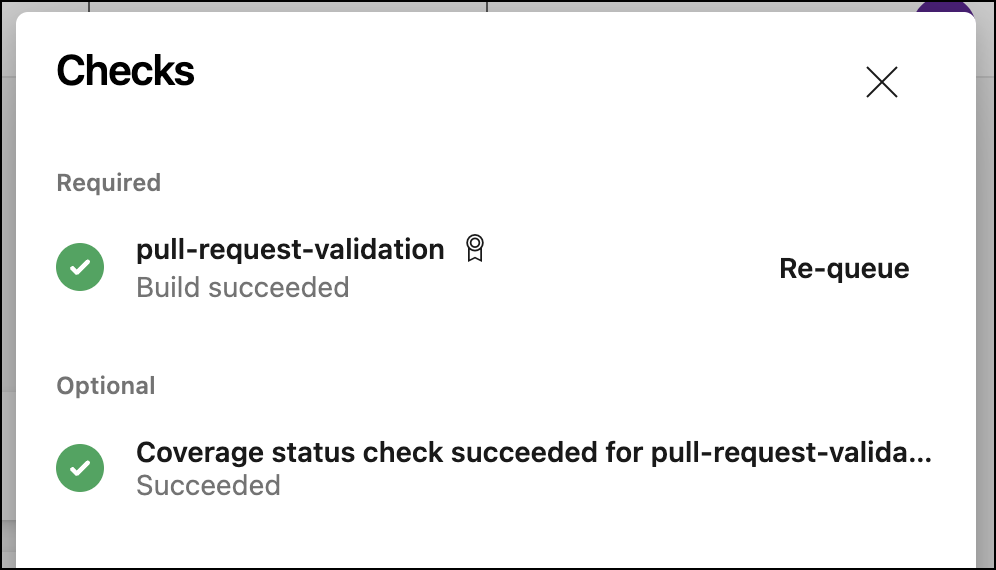
The pull request's coverage check passed
You'll also get a comment in the PR's discussion saying that the coverage check passed.
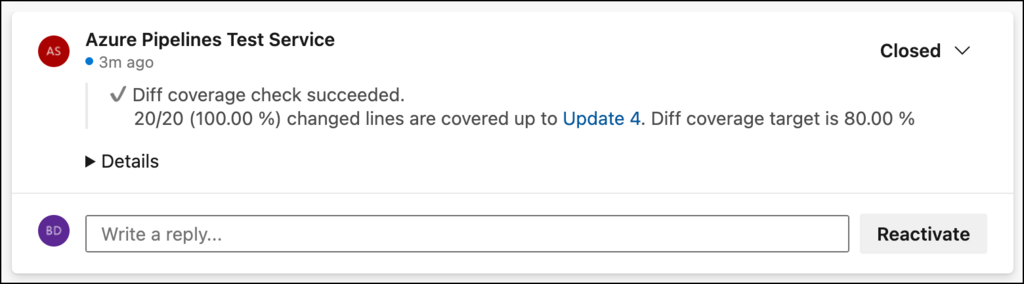
The comment saying that the PR coverage check passed
How to Make PR Code Coverage Required?
The code coverage check in a pull request is optional by default. Meaning that the check can show that the code coverage is inadequate/failing but the pull request could be approved and completed thus merging the changes from the branch back to main.
How do you change that to make it actually be required? You'll need to add a Status Check to the Git Repository's branch policies. To get to the proper screen, click on Project settings then Repositories then click on your repository name. You should now be on the Settings page for your repository.
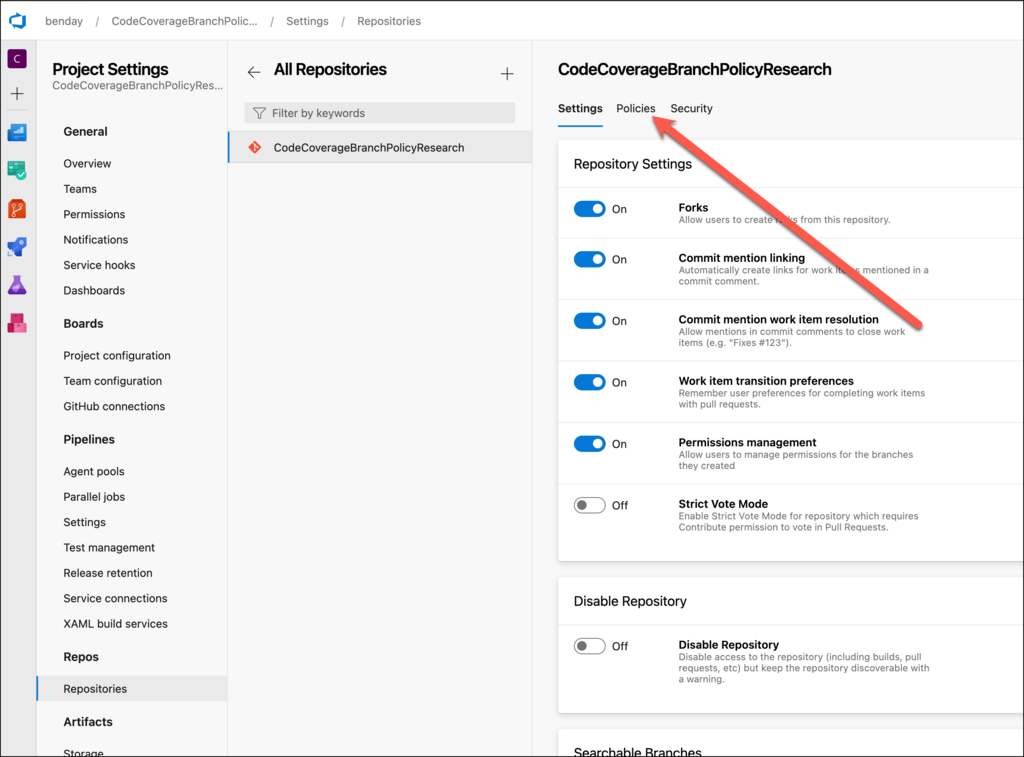
The Settings page for the Git Repository
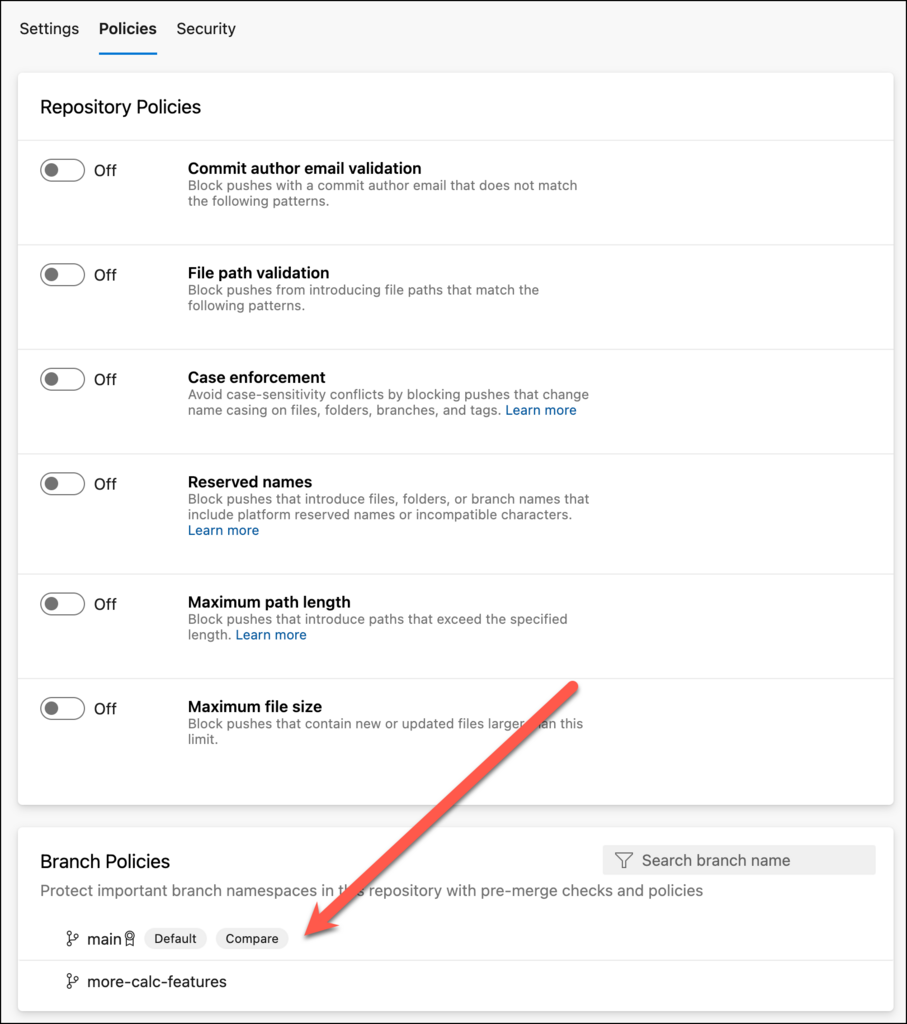
Once you get to the Settings page, click on the Policies tab. At the bottom of the Policies tab, you'll see a section that says Branch Policies.
Click on the Main branch to bring up the policy editor.
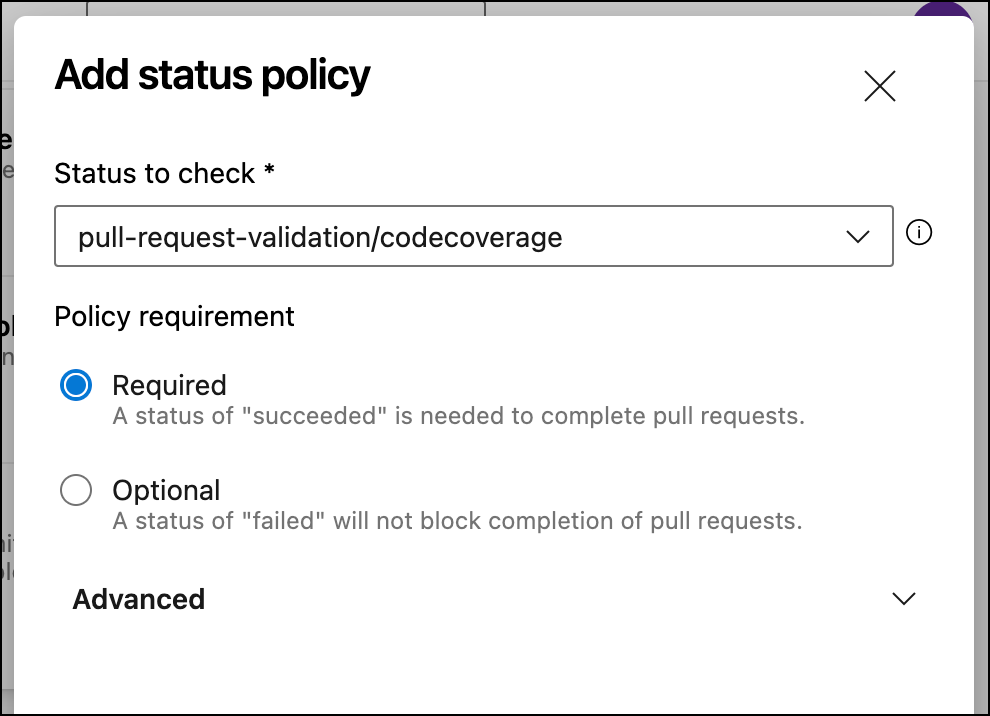
You're finally on the branch policies page. You should see the Build Validation policy that been running the builds as part of your pull requests. You'll also see a section that says Status Checks. We're going to add a status check for code coverage. Click on the + button in the Status as shown below.

You should now see a dialog that says Add status policy. The status that you want to check is going to be named "/codecoverage". Select it from the Status to check select list field. Click the Save button at the bottom of the dialog.
Back on the policies tab for the repository, you should now see your new code coverage status check policy.
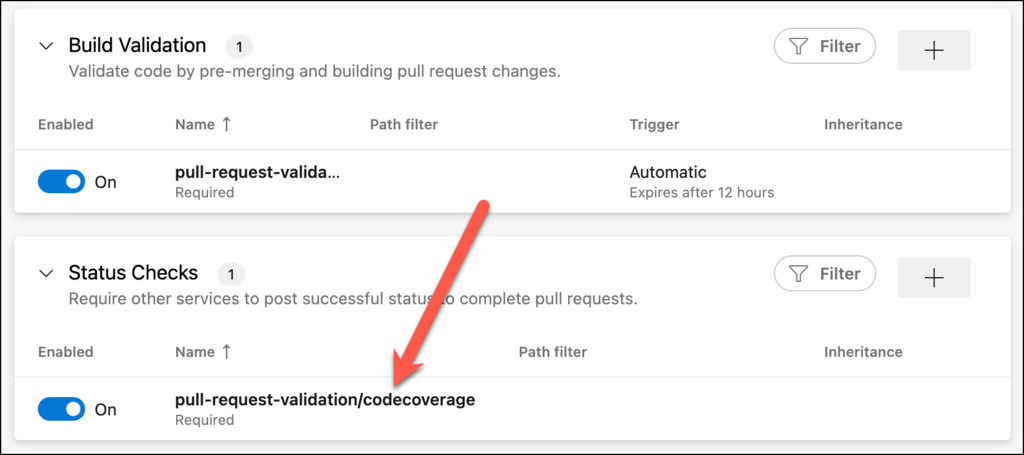
The new code coverage status check policy
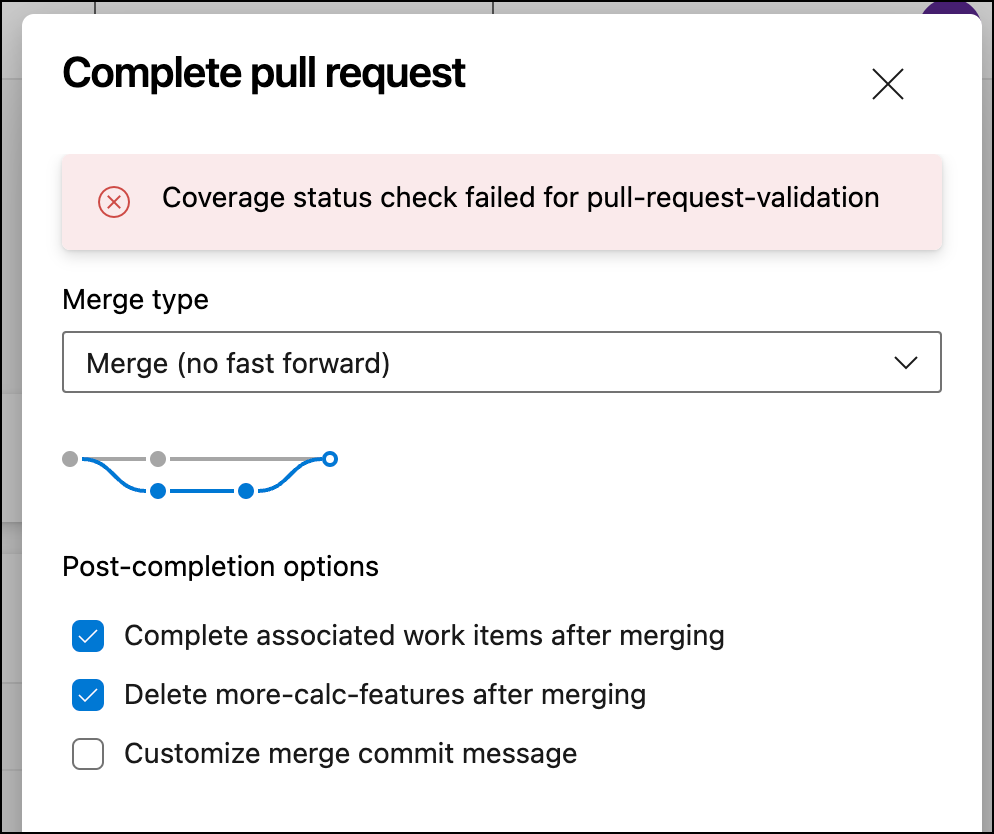
Now if I go back to the pull request and try to complete it, I'll get an error message saying Coverage status check failed for and Azure DevOps won't allow me to complete the pull request.
Summary
Azure DevOps has a lot of features that help you streamline your pull request review process. One of them is to help you enforce proper code coverage as part of your pull requests and branch policies. There are a handful of things to remember:
Add a file to your repository named azurepipelines-coverage.yml
Confirm the coverage settings in azurepipelines-coverage.yml and remember to turn the comments option to on
If you want to make code coverage policy compliance required as part of your pull requests, create a Status Check policy for your Git repository
I hope this helps.
-Ben
-- Looking for help with automated testing and code coverage for your applications and Azure DevOps Pipelines? Not quite sure how to configure your branch policies? Need help getting your team comfortable with using Pull Requests as part of their Scrum or Kanban process? We can help. Drop us a line at info@benday.com.