This is Chapter 9 of Azure Cosmos DB for .NET Developers. Previous: Chapter 8: Change Feed & Event Patterns.
I'm a huge fan of Cosmos DB — enough to spend lots and lots of time writing this book. I like writing apps against it and I think it makes so many excellent things possible and easier with application architecture. I use it every day and I've used it in multiple production systems.
So when I say this next bit, hopefully, you'll know that I'm saying the following with a heavy heart filled with regret. Here goes.
Permissions management in Cosmos DB is hard. It's just kind of obtuse. That said, this permissions management jumble isn't unique to just Cosmos DB. SQL Azure and Key Vault definitely wrestle with this, too. I'd bet that a lot of other Azure products also would have similar issues.
It all comes down to a not-exactly-obvious distinction between defining resources in Azure and using resources in Azure.
Hopefully by the end of this chapter, it'll be less confusing.
Access Keys vs. Azure Managed Identity
After dumping on permissions management in Cosmos DB, I'm going to immediately reverse myself. There is an "easy button" — a way of accessing your Cosmos stuff that makes sense.
Access Keys
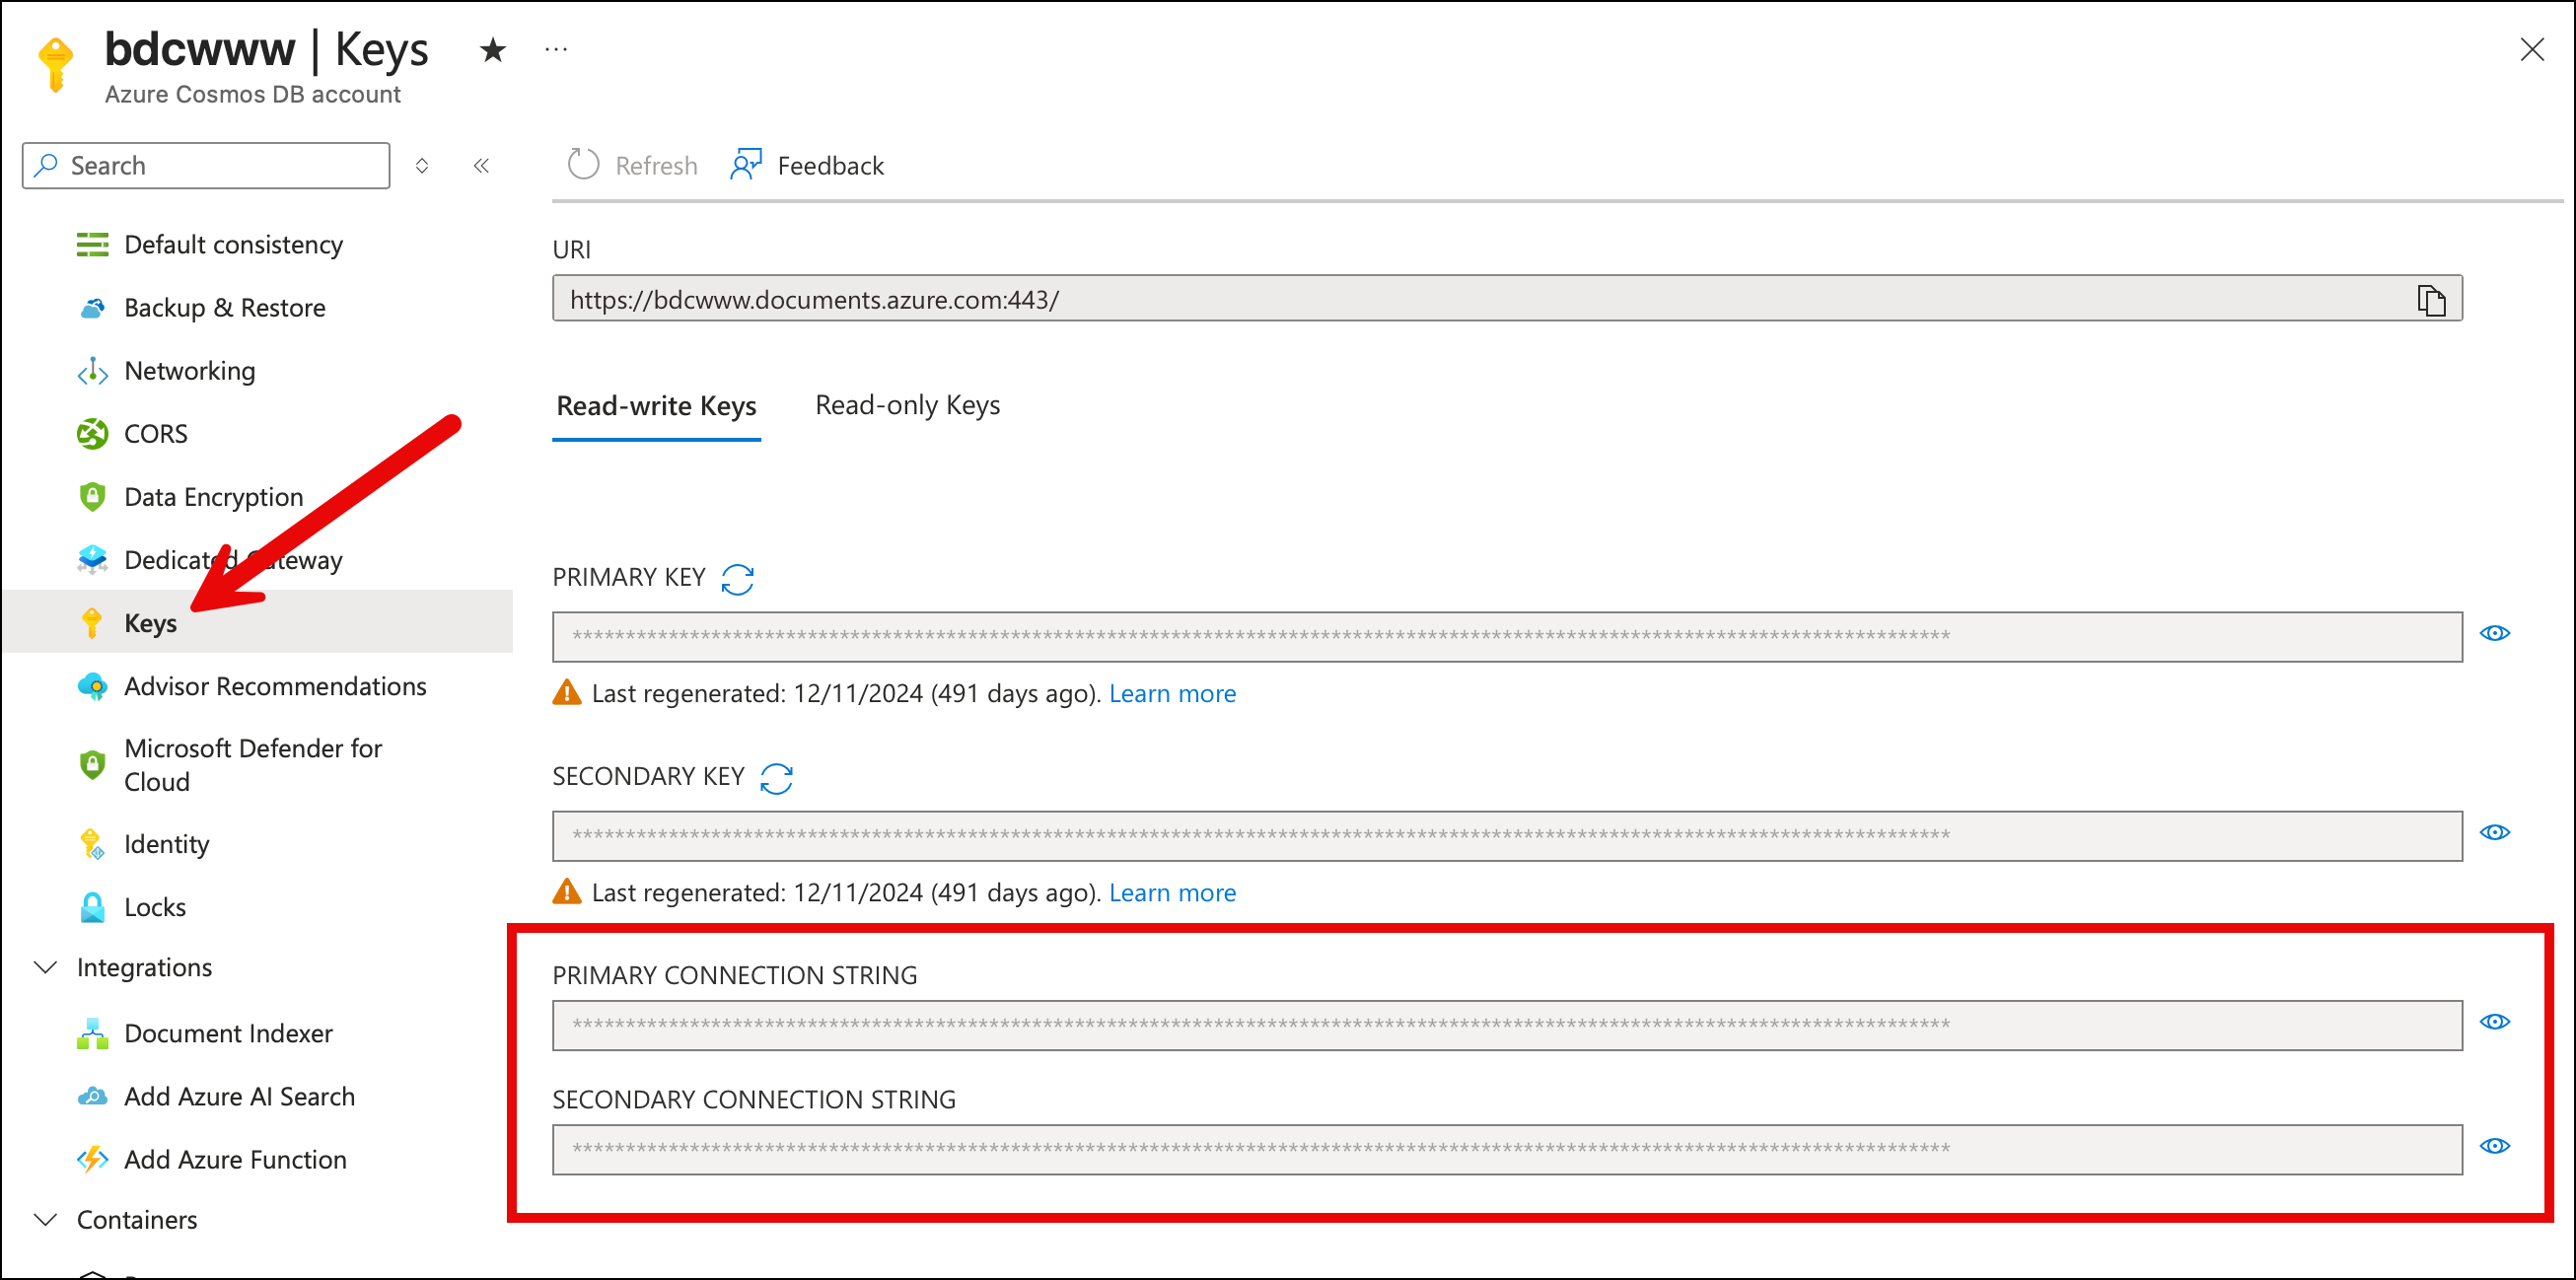
The easy way to access Cosmos DB is using access keys. You open up the portal and go to the Keys section and then all the stuff that you want is right there. It's got your endpoint URL and it's got your access keys. There's even a nicely formatted connection string that you can copy and paste. There are read-write keys and read-only keys, too.
Grab these read-write keys and you're good to go. You can do admin tasks like creating databases and containers and you also do data access so you can read and write data.
What's not to love? It's not as secure as you'd want to be.
Blast from the Past: On-Prem SQL Server Active Directory Auth
Remember back to the days of writing .NET apps against SQL Server and everything ran inside your data center? No cloud stuff. No Azure stuff. Just apps running on a server that's joined to your Active Directory Domain. Your app probably had a connection string that looked something like this:
Server=sqlserver123; Database=billing-prod; Integrated Security=True;
Notice that there's no password in that connection string. Heck! There's not even a username in that string. It's because of that Integrated Security=True thingy. You probably had to do some admin in Internet Information Server (IIS) to configure your application's App Pool to run as a certain specific user. It was a little bit fiddly but once you did that, you didn't have to worry about passwords anymore. You could grant that app pool user the right permissions in SQL Server and then the security stuff all got handled via Active Directory. No passwords required. You probably even turned off username/password-based auth in SQL Server for even tighter security.
No pasting passwords into app.config or appsettings.json. No clear-text passwords for someone to steal. No passwords anywhere.
Then comes February 2010 and Azure becomes a thing and suddenly we're back to passwords (aka. tokens).
Azure Managed Identity
Fast forward to September of 2017 and Microsoft announces Azure AD Managed Service Identity. That ultimately got renamed Azure Managed Identity. What Azure Managed Identity does is let you get back to something password-less that looks more like that on-prem passwordless auth to SQL Server. Except this time, the goal is to be able to go passwordless to just about everything Azure to everything else in Azure.
It can get a little fiddly at first but it's the best-practice for Azure security and it puts all that permissions management stuff into Entra. It's unified and passwordless and centrally maintained.
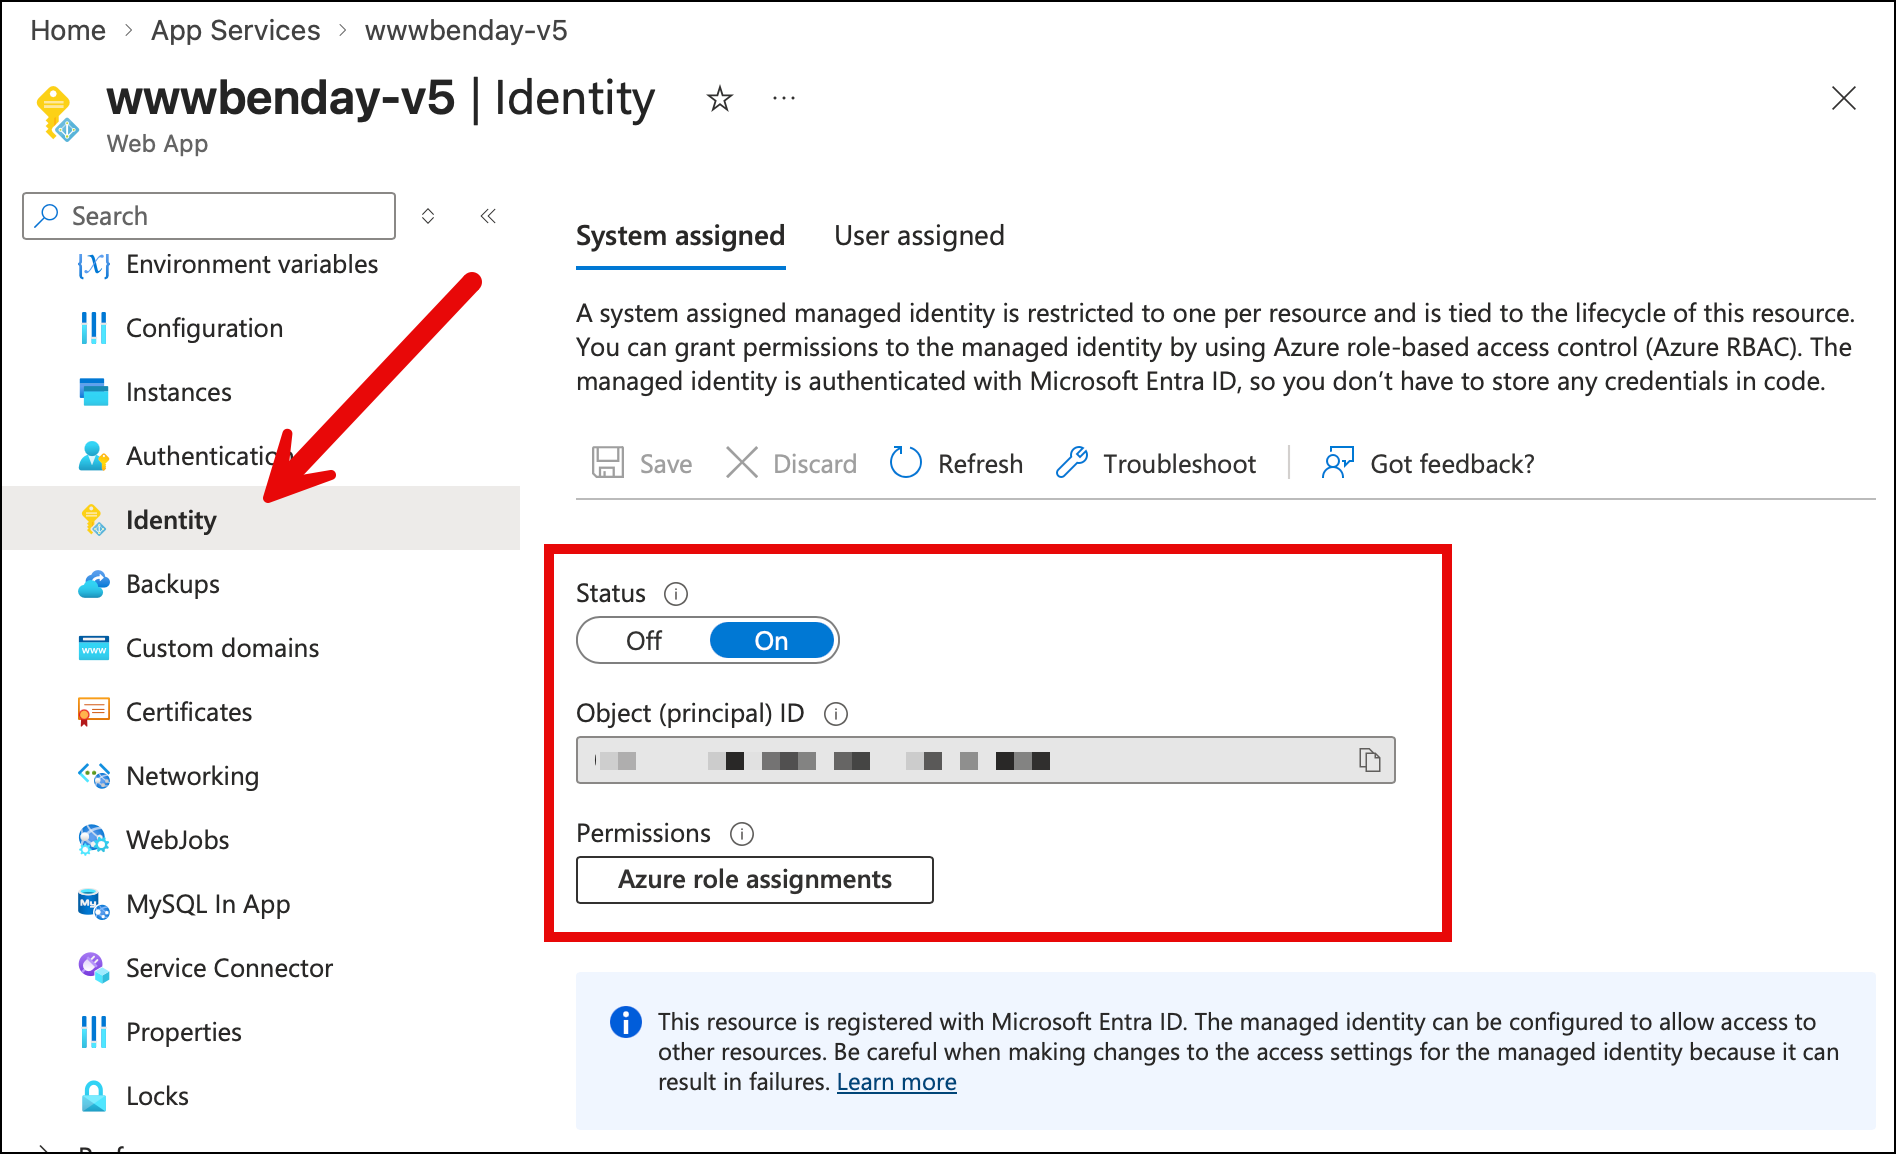
This identity starts by going to the Azure resource that needs the permission. For example, the App Services Web App that runs www.benday.com uses a system managed identity. To set it up, I open the web app in the Azure Portal and went to the Identity section, then I set the Status to on and clicked save. That does some magic in my Entra tenant for my Azure Subscription and then I get a guid value that describes the object id for my web app.
Once I have that object id guid, I can grant it permissions in Cosmos and then the app runs without using a password.
There's also an option to create a user assigned identity that works pretty much the same way. It roughly the equivalent of having your IIS app pool run as a specific user. I tend to use the system managed identity but that's more of a personal preference thing.
But anyway, now that I've showed you that Identity section on the Azure Portal, go click around in your resources on Azure. Pretty much everything has that Identity section in the admin UI and for production systems, you probably want to AVOID using anything other than Azure Identity.
Best practice: no access tokens and no passwords.
What about Key Vault?
Yahhhhhh...I knew that this would have to come up. Key Vault tries to bridge the divide between using passwords/tokens securely and being completely password-free. I think of it as an intermediate form of passwordless auth in Azure.
Let's look at the product launch timeline:
- Azure is announced in 2010
- Azure Key Vault is announced in 2015
- Azure Managed Identity is announced in 2017
Key Vault comes before Identity and gives you a way to store keys, secrets, and certificates in Azure in a way that allows you to control access to those secrets. So a permissions layer over the secret stuff.
There's still a need for Key Vault in a whole bunch of different scenarios. But for the .NET app to Cosmos DB use case, the most straightforward approach is Azure Managed Identity.
The Quest & The Core Problem
To summarize what we've covered so far in this chapter: it all comes down to my strong recommendation that you do auth to Cosmos DB using Azure Identity (Entra ID, etc).
If passwordless auth using Identity is the recommendation, next I'm going to give something to try.
The Quest
You've made it to chapter 9 of this book. You know some things about Cosmos DB. You've written some code. You've tried some stuff on the emulator. At a minimum you've reached the 'mildly dangerous' skill level.
I've got a mission for you. A cosmos quest. Go to the Azure Portal (https://portal.azure.com) and go to an existing Cosmos DB instance. Now I want you to grant a user permissions to read and write data to Cosmos.
Go ahead. Give it a try. I'll wait.
You probably clicked Access control (IAM) and then something like Add role assignment. Then you went looking for kind of permission with the words read or write or maybe contributor in the name. Sound about right?
And you completely struck out. It's not there.
There are things like Cosmos DB Account Reader Role and DocumentDB Account Contributor but when you read the description, it's not really what you want — they're all about administration of databases and containers but not reading or writing data inside those container. But you try one or two hoping that it'll work and you try to access Cosmos from your app. And your app responds with something like:
Request is blocked because principal [your-app-identity] does not have
required RBAC permissions to perform action
[Microsoft.DocumentDB/databaseAccounts/readMetadata] on resource [/].
Whatever you did isn't right.
The Core Problem
You tried to grant permissions to an Identity in Cosmos via the Azure Portal and failed...
...or did you?
You didn't fail exactly. You didn't achieve your goal but it wasn't for lack of trying.
You just simply cannot grant data access permissions via the Azure Portal for Cosmos DB.
The End.
The Two Permission Systems
The first thing that is going to sound weird and is going to keep sounding weird for a little while is that Cosmos DB has two separate permission systems, and they don't really know about each other.
They are the control plane and the data plane.
The control plane is the Azure-y resource-y stuff. Creating a Cosmos DB account. Creating a database inside that account. Creating a container inside that database. Changing throughput. Modifying an indexing policy. Setting up a TTL. Configuring a vector indexing policy. Deleting any of those things. If it's a configuration change about the shape of your Cosmos resources, it's a control plane operation. These permissions are managed the same way permissions are managed for basically every other Azure resource — through standard Azure RBAC, the stuff the portal's Access control (IAM) blade is built for.
The data plane is the stuff your application does within those resources. Read a document. Write a document. Run a query. Listen to the change feed. Bulk import a million records. Anything where you're poking at the data inside Cosmos — rather than the shape of Cosmos — is a data plane operation. These permissions are managed through a completely separate, Cosmos-specific RBAC system that was added to the product a few years ago.
Here's where it gets weirder. The portal's IAM blade — the one where you assign roles — only shows you control plane roles. The data plane roles aren't there. They exist. They're real. They work. They're just not surfaced in the UI that looks like it should be surfacing them.
So when you go to the portal and assign a role to your App Service's managed identity and you pick something that sounds like it might let your app read documents — something like Cosmos DB Account Reader Role — what you've actually granted is control plane access. Your identity can now view the account's configuration. It can read the list of databases. It cannot read a single document in those databases. That's a different system entirely.
Your app hits a document read, Cosmos says "do you have data plane permission for that?", the answer comes back "no, but they do have control plane permission," and Cosmos says "that's nice, I don't care, request denied."
This is the first thing to internalize. Account-level RBAC (what the portal surfaces) is NOT the same thing as data-plane RBAC (what your application needs). You need both. At the same time. For different purposes. And they're configured separately.
Control Plane vs. Data Plane: The Breakdown
OK, two planes, two systems. What actually lives in each one? The split isn't always obvious from the operation name, so here's the full list.
| Operation | Plane | Who grants it |
|---|---|---|
| Create, delete, or modify the Cosmos account | Control | Owner / Contributor on the subscription or resource group |
| Read account keys and connection strings | Control | Contributor on the account (Cosmos DB Operator does not grant this) |
| Create or delete a database | Control | Cosmos DB Operator |
| Create or delete a container | Control | Cosmos DB Operator |
| Modify a container's indexing policy | Control | Cosmos DB Operator |
| Modify a container's vector indexing policy | Control | Cosmos DB Operator |
| Modify a container's TTL settings | Control | Cosmos DB Operator |
| Modify throughput (autoscale, manual, RU/s) | Control | Cosmos DB Operator |
| Modify unique key constraints (at container creation) | Control | Cosmos DB Operator |
| Configure backup policy, failover, network rules | Control | Contributor on the account |
| Create or remove data-plane role assignments | Control | Contributor on the account |
| Read a document (point read) | Data | Cosmos DB Built-in Data Reader |
| Query documents | Data | Cosmos DB Built-in Data Reader |
| Read the change feed | Data | Cosmos DB Built-in Data Reader |
| Create, replace, upsert, or patch a document | Data | Cosmos DB Built-in Data Contributor |
| Delete a document | Data | Cosmos DB Built-in Data Contributor |
| Bulk operations on documents | Data | Cosmos DB Built-in Data Contributor |
| Execute a transactional batch | Data | Cosmos DB Built-in Data Contributor |
| Read account metadata (needed for SDK handshake) | Data | Both built-in data roles include readMetadata |
Two things jump out at me when I look at this table.
Cosmos DB Operator gives you "schema", not data. That's the whole point of the role. It exists specifically so you can grant "can create and configure containers but cannot read any of the data inside them" to a deployment identity. That's the role you'd give to your CI/CD pipeline. It is not the role your running app should have.
Let's say that again: your app running in production shouldn't have control plane access for security reasons. Unless you've got some kind of exotic situation, the app just simply shouldn't need it. So don't grant it.
Your running app needs one role, not two. If your production App Service has both control plane and data plane rights, you've over-granted. The split exists to enforce the separation — deployment tooling configures the shape, the running app touches the data, and neither can do the other's job by accident. That's the architecture to aim for.
How You Actually Grant Data Plane Access
So if the portal can't do it, what can? There are five paths that work, roughly in the order most people pick them up.
Azure CLI. The everyday tool. az cosmosdb sql role assignment create with the account name, resource group, principal ID, and role definition ID. This is what I use for ad-hoc grants during development and it's what most tutorials default to. The canonical command looks like this:
az cosmosdb sql role assignment create \
  --account-name <your-cosmos-account-name> \
  --resource-group <your-resource-group> \
  --scope "/" \
  --principal-id <the-object-id-of-the-identity> \
  --role-definition-id 00000000-0000-0000-0000-000000000002
That last parameter is the magic GUID. 00000000-0000-0000-0000-000000000002 is Built-in Data Contributor. 00000000-0000-0000-0000-000000000001 is Built-in Data Reader. Those IDs are not typos. They are sequential magic numbers. They look like somebody generated them on a Monday morning. They are, in fact, the actual values you have to paste into role assignment commands. I don't love it either. But once you've seen them a few times you can recognize them — if you spot 0000...0002 in a script, you know somebody is granting Cosmos data plane contributor access.
The --principal-id is the thing that gets a little confusing. It is not the user's email address. It is not the App Service's name. It is the object ID of the identity in Microsoft Entra ID.
For a user in Entra: az ad user show --id your.email@example.com --query id -o tsv
For a managed identity on an App Service: go to the App Service in the portal, click Identity, and copy the Object (principal) ID. Or, from the command line: az webapp identity show --name <app-name> --resource-group <rg> --query principalId -o tsv
Azure PowerShell. New-AzCosmosDBSqlRoleAssignment from the Az.CosmosDB module. Same semantics as the CLI, different syntax. If your team lives in PowerShell, use this.
Bicep or ARM templates. Declare a Microsoft.DocumentDB/databaseAccounts/sqlRoleAssignments resource in your infrastructure code, parented to the Cosmos account. This is the right answer for production — role assignments belong in your IaC alongside the Cosmos account itself, not as imperative CLI commands someone ran once and forgot about.
If you're using a lot of this Infrastructure as Code (IaC) stuff, you might find that this is where you want to use "user assigned" identities rather than "system managed" identities. I find this especially helpful for Bicep but the reason is a little 'in the weeds'. The system managed identity is represented by a guid value that's created when the identity is created for a resource. If you want to reference that object id guid in your Bicep stuff, you often have to do extra stuff to find that guid value. If you do it as a "user assigned" identity, then you declare that identity in Bicep and it becomes an actual, easily referenceable thing. That gives you a certain amount of "compile time" checking.
Terraform. azurerm_cosmosdb_sql_role_assignment. Same idea as Bicep, different IaC ecosystem.
Direct REST API. az rest --method PUT against the management plane, if you're desperate or scripting in a language that doesn't have Azure tooling. Rarely needed.
The portal is not on that list. (Meh.)
Seeing What's Actually Assigned
Because the portal won't show you data plane role assignments, the CLI is also how you view them. To list every data plane role assignment on an account:
az cosmosdb sql role assignment list \
  --account-name <your-cosmos-account-name> \
  --resource-group <your-resource-group>
The output includes the principal ID, the scope, and the role definition ID for each assignment. Combine it with az ad sp show --id <principal-id> or az ad user show --id <principal-id> and you can resolve each GUID back to a human-readable identity.
This is the only way to answer the question "who has data plane access to our production Cosmos?" And it's a question you're going to need to answer eventually — during a security audit, during onboarding a new team member, or during a "why does this deployment keep working when we thought we removed that service principal six months ago" investigation. Bookmark the command. We'll come back to it in Chapter 14 when we cover operational audit patterns in more depth.
Granting Permissions Across Subscriptions
Here's some sand to pour in your gears. A thing that comes up all the time in enterprise-land: Azure Identity permissions across subscriptions.
Let's say you've got a managed identity (or a user, or a service principal) in one subscription, and the Cosmos DB account you want to grant it access to lives in a different subscription. This happens constantly — shared platform services in one subscription, per-team or per-environment application workloads in others, a "platform" subscription with a managed identity that needs data plane access to half a dozen Cosmos accounts scattered across a bunch of other subscriptions.
The Microsoft docs mostly show you az account set --subscription <sub-id> and then run your command. That works fine when you're granting permissions within just one subscription. It gets confusing and annoying and buggy real fast when you're granting permissions across several subscriptions in the same script, because every command after the az account set is now pointing at the new subscription, and it's easy to lose track of which one you're currently on. (Go ahead. Ask me how I know this is confusing, annoying, and buggy.)
The better approach is to pass --subscription directly on each command. That flag is a global parameter — every az command accepts it — and it accepts either the subscription name or its GUID. Pass it inline and the command targets that specific subscription without changing your shell's current context. Nothing to forget to reset afterward.
az cosmosdb sql role assignment create \
  --subscription <subscription-name-or-id> \
  --account-name <account> \
  --resource-group <rg> \
  --scope "/" \
  --principal-id <object-id-of-the-identity> \
  --role-definition-id 00000000-0000-0000-0000-000000000002
One thing that's worth knowing for this scenario: the principal ID is tenant-scoped, not subscription-scoped. An object ID in Entra ID is unique across your whole tenant. So you can take a managed identity that lives in Subscription A and grant it data plane access to a Cosmos account in Subscription B, as long as both subscriptions are in the same Entra tenant. The principal ID doesn't change. What changes is the --subscription you're targeting with the assignment command — that has to match the subscription where the Cosmos account lives.
This is actually a really common real-world pattern. A shared managed identity in a "platform" subscription that needs data plane access to Cosmos accounts in several "application" subscriptions. The identity is one object. The role assignments live in each Cosmos account's subscription. You'd script it as a loop that calls az cosmosdb sql role assignment create with a different --subscription each iteration, same --principal-id every time. Explicit, scriptable, and you never have to wonder which subscription your shell is pointed at.
It's Messy...So Why Did Microsoft Do It This Way?
Caveat first: I don't work at Microsoft. I don't have a source on the inside telling me what the Cosmos team was thinking. What follows is educated guessing.
I think permissions management in Cosmos DB is confusing. But why did it end up this way? Why was it built this way? Why isn't this more streamlined?
It's the Way that Azure Works
Azure consists of what feels like a nearly endless list of products. These products are available for you to create via the Azure Portal and when you create an instance of one of these products it becomes a resource. And resources live in resource groups. Azure as an automated system administration and an automated data center admin "tool", is spinning up and billing you for the use of resources.
It's all about resources.
I started using Azure about a year before it was publicly announced. Back in those days it used to be called "Project Red Dog". So that's probably 2009-ish that I first got involved in what would become Azure.
Back then I did TONS of system administration as part of my work as a software architect and DevOps process consultant. Setting up and administering Window Server. Setting up and administering Active Directory Domain Controllers. Installing and configuring SQL Server and SQL Server clusters. Load balancers. Team Foundation Server instances and Azure DevOps Server instances. And then related to all of this was worrying about disk arrays and RAID configurations and backups and redundancy and failover.
I did a lot of sys admin tasks. I spent a lot of time in loud, freezing-cold data centers huddled around server racks. But I didn't think about that stuff as being significant — it was just part of the gig.
But think about now. I can't remember the last time I was in a corporate data center. I can't remember the last time I even saw a server. Now I pop into the Azure portal, spin up a VM or an instance of Azure Storage or Cosmos or SQL Server and go. Typically, off and running in a matter of minutes.
And when I'm done with one of those things, I just click delete and they all go away.
That's not easy to do, kids! That ain't nuthin'. Microsoft has developed a system to provision, manage, bill for, monitor, and deprovision all of that stuff. And when you really start thinking about what has to go in to that — I dunno about you — but that just BLOWS MY MIND how complex that is.
But in order to do that, there are tradeoffs. Azure has to be able to generalize and abstract things down to resources that it manages.
Asking the Azure data center automation framework and Azure Portal to also provide comprehensive admin UIs for the innards of all these things? Well, I suspect that if they'd tried to pull that off that Azure never would have shipped.
Performance Reasons
There is another Azure architectural reason the two systems are separate. Cosmos DB is designed to handle millions of operations per second, and every single document read has to answer "does this principal have permission?" If that check had to round-trip to Azure's central RBAC service, you'd potentially be adding cross-service latency to every request. So the Cosmos team built their own RBAC system that runs inside Cosmos itself, colocated with the data engine. Role assignments live under the Microsoft.DocumentDB provider rather than Microsoft.Authorization. The lookup is fast because it never leaves Cosmos.
That explains why the two systems exist. So what about the portal?
Why No Data Plane Admin in the Portal?
So you can't do data plane admin in the Azure Portal. Why? I suspect that it's a little bit philosophical and a little bit practical realities. The Azure Portal is focused on resources because that's what Azure is focused on. The portal (more or less) is focused on driving the stuff that the Azure data center framework does.
If I'm thinking from a product perspective, you have to stay focused and you can't be everything to everyone. You probably could implement data plane permissions via the portal but now you're taking on a whole new set of complexities and features. I'd bet that it was considered...and then dropped to the bottom of the backlog. Too hard to pull off and do well.
I do wish that the portal had a prominent message that says something like "hey. Looking to grant data access permissions? Those are all done via CLI-only." That would have saved me a whole lot of confusion.
The good news is that once you know the gap exists, it's not hard to work around. CLI for ad-hoc. Bicep or Terraform for production. Just remember to ignore the IAM blade when it comes to data access. "These aren't the droids you're looking for." Treat the portal as a read-only dashboard for control plane things and you'll be fine.
Reading the Error Messages
Let's go back to that error message from the Quest section, because now you can actually read it. Here it is again:
Request is blocked because principal [your-app-identity] does not have
required RBAC permissions to perform action
[Microsoft.DocumentDB/databaseAccounts/readMetadata] on resource [/].
Notice that it names readMetadata specifically. Not read, not query, not whatever operation your code was actually trying to do. It's almost always readMetadata. This throws people off every time, because the natural assumption is that the named action is the one that failed, and nobody's code is calling something literally named readMetadata.
Here's what's actually happening. Before the SDK does anything else, it has to do a handshake with the account to figure out partition key ranges, container routing information, and other metadata about where the data you're asking for physically lives. That handshake calls readMetadata. Every real operation — every document read, every query, every change feed subscription — depends on the SDK having done that handshake successfully. If your identity doesn't have at least one of the built-in data roles, readMetadata is the first thing that fails, before your code ever gets a chance to attempt whatever it was actually trying to do.
So if you see readMetadata in the error, it almost never means something's wrong with your metadata query. It means your identity is missing the basic "I'm allowed to talk to this account at all" permission that every real operation builds on top of. Ninety percent of the time, the fix is "assign the identity Built-in Data Contributor (or Reader) via az cosmosdb sql role assignment create and try again."
The other ten percent is usually one of two things. Either the role assignment exists but hasn't propagated yet (Cosmos can take a minute or two to reflect new role assignments — if you just created the assignment and it's still failing, wait two minutes before doing anything else). Or you assigned the role to the wrong principal ID. The most common version of this mistake is grabbing the App Service's Application ID instead of its managed identity's Object ID. They're different GUIDs. They sit right next to each other in the portal. Only the Object ID works for role assignments. I've made this mistake more than once and I'm the one writing the book about it.
What Each Credential Can Actually Do
Before we get into the library config and the deployment walkthrough, let's put one more table on the page. This one compares what you can do with each kind of credential — because most Cosmos tutorials treat the primary key and a managed identity as two equivalent ways to authenticate, and they're not.
The primary key (the primary access key) is a broad credential by design. It can do every data plane operation. It can also do every control plane operation that Cosmos itself manages — create databases, delete containers, rewrite indexing policies, crank throughput to 100,000 RU/s and leave it there. What it can't do is anything at the ARM layer: modify the account's networking, change the backup policy, rotate its own key, or delete the account itself. Those still need Azure RBAC on the account resource. Within Cosmos itself, though, the key grants broad access across both planes.
That means when you paste a primary key into appsettings.json, you're not just dropping a secret into a file. You're giving the application that loads that file — and anyone who can read that file — the authority to rewrite every container, drop every database, and reindex every collection in the account. Your simple CRUD app has the permissions of a platform administrator. And there's no way to scope it down. You can't give a service "primary key minus container delete." It's all or nothing.
Managed identity + a data plane role assignment is different. It grants exactly the permissions you named and nothing else. You can decompose what used to be a single blunt credential into separately-grantable capabilities. Schema for the deployment pipeline. Data for the app. Reporting access for the dashboard. Nothing for anyone else. That decomposition is the actual win.
Here's the comparison in one place:
| Operation | Primary Key (connection string) | Cosmos DB Operator (control plane) | Built-in Data Contributor (data plane) | Built-in Data Reader (data plane) |
|---|---|---|---|---|
| Read documents (point read, query) | ✅ | ❌ | ✅ | ✅ |
| Read change feed | ✅ | ❌ | ✅ | ✅ |
| Create, update, delete documents | ✅ | ❌ | ✅ | ❌ |
| Bulk operations, transactional batch | ✅ | ❌ | ✅ | ❌ |
| Create or delete a database | ✅ | ✅ | ❌ | ❌ |
| Create or delete a container | ✅ | ✅ | ❌ | ❌ |
| Modify indexing policy | ✅ | ✅ | ❌ | ❌ |
| Modify vector indexing policy | ✅ | ✅ | ❌ | ❌ |
| Modify TTL settings | ✅ | ✅ | ❌ | ❌ |
| Change throughput (RU/s, autoscale) | ✅ | ✅ | ❌ | ❌ |
| Modify unique key constraints (at creation) | ✅ | ✅ | ❌ | ❌ |
| Read account keys / connection strings | ❌ | ❌ | ❌ | ❌ |
| Rotate account keys | ❌ | ❌ | ❌ | ❌ |
| Create or remove data plane role assignments | ❌ | ❌ | ❌ | ❌ |
| Configure networking, firewall, private endpoint | ❌ | ❌ | ❌ | ❌ |
| Configure backup policy, failover regions | ❌ | ❌ | ❌ | ❌ |
| Delete the Cosmos account | ❌ | ❌ | ❌ | ❌ |
The bottom six rows are pure ARM operations — they need Azure RBAC roles on the account resource itself (Contributor or similar). No Cosmos-specific credential, key or role, can touch them.
And the "who should have what" recommendation becomes:
| Identity | Credential approach |
|---|---|
| You, local dev against a real Cosmos account | az login + Cosmos DB Operator + Built-in Data Contributor |
| Production app (App Service, Functions, Container App) | Managed identity + Built-in Data Contributor — nothing else |
| Deployment pipeline (Bicep, Terraform, GitHub Actions) | Service principal + Cosmos DB Operator on the account + Contributor on the RG for ARM-level things |
| Read-only reporting service | Managed identity + Built-in Data Reader |
| Nobody, ever, in production | The primary key |
That last row is where the contrast hits hardest. The primary key can do everything in the "can do" column, including the schema-level operations that a running app has no business doing. That's not because the key is a bad credential — it's because the key predates the RBAC data plane by years, and it was designed for a time when "can this principal do this operation" was a coarser-grained question than we ask today. RBAC gives you the decomposition the key never could. That's the upgrade path.
The primary key has one honest use: the emulator. The emulator ships with a well-known, publicly-documented key. It's not a secret, there's nothing to leak, and RBAC setup against a local emulator would be friction without benefit. Use the key there. Use managed identity everywhere else.
What DefaultAzureCredential Actually Does
The mechanism that makes the managed identity path pleasant in .NET is a class called DefaultAzureCredential, which lives in the Azure.Identity NuGet package. It's what my Benday.CosmosDb library uses when you flip the config switch. But before we get to that switch, it's worth understanding what DefaultAzureCredential is actually doing, because it's a small piece of magic and the magic is worth knowing.
DefaultAzureCredential is a credential chain. When your code asks it for a token, it walks through a list of credential sources in order, trying each one, returning the first one that works. The list looks roughly like this:
- Environment variables (things like
AZURE_CLIENT_ID,AZURE_CLIENT_SECRET,AZURE_TENANT_ID— the service principal approach, usually set in CI/CD pipelines) - Managed Identity (is the code running on an Azure resource that has a managed identity? use it)
- Azure CLI login (are you logged in via
az login? use that identity) - Azure PowerShell login (same idea, but for
Connect-AzAccount) - Visual Studio / VS Code signed-in account (are you signed into an Azure account in your IDE? use that)
- A few others that are less common.
This chain is why the managed identity story feels seamless. The exact same code that runs in production with a managed identity also works on your laptop during development, because locally you're signed into az login and the chain falls through to that credential. You don't need one code path for local and another for production. You write:
var credential = new DefaultAzureCredential();
And that credential works everywhere, because it adapts to its environment. Running in App Service? It uses the managed identity. Running on your laptop? It uses your az login session. Running in a GitHub Actions pipeline? It uses the environment variables your workflow set.
This is genuinely lovely when it works. But it can be a little bit maddening when it doesn't. Here's the scenario that gets a little frustrating: since DefaultAzureCredential is a chain of credentials, it's entirely possible that it picks one with some but not all the permissions you need and then it errors out. What is often lost is which credentials did it try and which one failed. Since the chain fails through silently, you can get "token acquisition failed" at the end without a clear indication of which link fell over.
There's an environment variable, AZURE_IDENTITY_LOGGING_ENABLED=true, that you can set to make the chain verbose about what it tried and what went wrong. File that one away for the day you need it. You'll probably need it some day.
The Local Dev Story
Here's what the local development experience looks like when you go this route.
You open a terminal. You log in:
az login
Your browser pops up. You authenticate. az remembers who you are.
You grant your own user identity the roles you need on the Cosmos account you'll be developing against. For a real account where you're also going to be creating containers and modifying indexing policies — which is most development scenarios — you need both planes:
# Control plane: Cosmos DB Operator (so you can create containers, etc.)
az role assignment create \
  --role "Cosmos DB Operator" \
  --assignee <your-user-object-id> \
  --scope /subscriptions/<sub-id>/resourceGroups/<rg>/providers/Microsoft.DocumentDB/databaseAccounts/<account-name>

# Data plane: Built-in Data Contributor (so you can read/write documents)
az cosmosdb sql role assignment create \
  --account-name <account-name> \
  --resource-group <rg> \
  --scope "/" \
  --principal-id <your-user-object-id> \
  --role-definition-id 00000000-0000-0000-0000-000000000002
Notice the two commands are different. The control plane grant uses az role assignment create — standard Azure RBAC. The data plane grant uses az cosmosdb sql role assignment create — the Cosmos-specific one. Same pattern, different commands, different resource providers under the hood.
Update your appsettings.json to remove the AccountKey and set UseDefaultAzureCredential to true:
{
  "CosmosConfiguration": {
    "Endpoint": "https://your-account.documents.azure.com:443/",
    "DatabaseName": "AppDb",
    "ContainerName": "AppContainer",
    "PartitionKey": "/tenantId,/entityType",
    "UseHierarchicalPartitionKey": true,
    "CreateStructures": true,
    "UseDefaultAzureCredential": true
  }
}
No account key. No connection string. No secret anywhere in the file.
One thing to watch out for: CreateStructures = true tells the library to create the database and container on startup if they don't already exist. That's a control plane operation, which means it needs the Cosmos DB Operator role to work. That's fine for local dev — you granted yourself Operator above. In production, you'd typically set CreateStructures to false and let your deployment automation (Bicep, Terraform, a setup script running under a service principal with Operator) handle container creation. The running app only needs data plane Contributor and shouldn't be creating or deleting containers.
Run the app. The credential chain tries managed identity first (you're not on an Azure resource, so that fails immediately), falls through to your az login session, grabs a token, hands it to the Cosmos SDK, the SDK makes the request, Cosmos checks the data plane role assignment, sees you have Contributor, lets the request through. Documents flow. You're doing real development against real Cosmos with zero secrets in your config.
When you hand the project off to a teammate, they do the same thing. They az login with their account, you grant their account the same two roles, and they're productive. Nobody ever sees a primary key. Nobody ever has to rotate one when somebody leaves the team.
This is the thing tutorials should be teaching, and for the most part they aren't.
The UseDefaultAzureCredential Flag in Benday.CosmosDb
Because this pattern is so common in production, my Benday.CosmosDb library has a single config flag that turns on the whole story:
{
  "CosmosConfiguration": {
    "Endpoint": "https://your-account.documents.azure.com:443/",
    "DatabaseName": "AppDb",
    "ContainerName": "AppContainer",
    "PartitionKey": "/tenantId,/entityType",
    "UseHierarchicalPartitionKey": true,
    "UseDefaultAzureCredential": true
  }
}
When that flag is false (the default, for backward compatibility), the library constructs a CosmosClient using the account key you provided — the old tutorial path. When it's true, the library ignores AccountKey entirely and constructs the client using new DefaultAzureCredential(). Your code doesn't change. Your repositories work the same way. Your queries run the same way. The library takes care of the switch under the hood.
In the fluent builder style, the same thing looks like this:
var config = CosmosConfigBuilder.Create()
    .WithEndpoint("https://your-account.documents.azure.com:443/")
    .UseDefaultAzureCredential()
    .WithDatabase("AppDb")
    .WithContainer("AppContainer")
    .WithPartitionKey("/tenantId,/entityType", useHierarchical: true)
    .Build();
One method call. The whole managed-identity-in-production-and-az-login-on-your-laptop story. Nobody has to remember the pattern. Nobody has to paste primary keys into config files.
Turning Keys Off for Good: disableLocalAuth
Remember earlier in the chapter when I mentioned that in the SQL Server on-prem days, you'd configure Integrated Security for your app and then — once you were sure everything worked — you'd turn off username/password auth in SQL Server entirely? Locking the other door once you had the Active Directory door open and working.
Cosmos DB has the same move. It's called disableLocalAuth.
Here's why it matters. Everything I've shown you up to this point is a recommendation. Your app uses managed identity. Your role assignments are in Bicep. Your developers az login locally and never touch a key. Great. But the primary key still exists. It's still in the portal. It still works. Anyone with control plane Contributor rights on the account can copy it and use it right now. A contractor you worked with six months ago, an ex-employee whose service principal never got cleaned up, an automation user that should have been decommissioned three re-orgs ago — if any of those has the key, they have full data plane access and there's nothing stopping them. You've made the RBAC path possible. You haven't made the key path impossible.
disableLocalAuth is how you lock the other door. It's an account-level property. Set it to true and key-based authentication stops working entirely. Every request that tries to authenticate with a primary key, a secondary key, or a connection string is rejected. Not rate-limited, not warned about — rejected. The only way to authenticate becomes Entra ID.
az resource update \
  --resource-group <your-resource-group> \
  --name <your-cosmos-account-name> \
  --resource-type "Microsoft.DocumentDB/databaseAccounts" \
  --set properties.disableLocalAuth=true
Or in Bicep, as part of your account definition:
resource account 'Microsoft.DocumentDB/databaseAccounts@2024-05-15' = {
  name: name
  location: location
  kind: 'GlobalDocumentDB'
  properties: {
    disableLocalAuth: true
    databaseAccountOfferType: 'Standard'
    locations: [ /* ... */ ]
  }
}
The flag is reversible — you can flip it back to false if something genuinely has to fall back to key auth during an incident — but the right posture for production is "on, and leave it on." Azure Policy even has a built-in policy (Cosmos DB database accounts should have local authentication methods disabled) that you can apply at the subscription or management group level. Once that policy is in place, nobody can spin up a new Cosmos account without key auth disabled. The door is locked, and the policy makes sure future doors get locked by default too.
Two things to know before you flip the switch.
It's currently only supported on the NoSQL API. If you're running a Cosmos account for MongoDB, Cassandra, Gremlin, or Table, disableLocalAuth either doesn't exist or works differently. Something to factor in if you're picking an API for a new project where this kind of lockdown matters.
Some tooling will break. If your team uses a Cosmos Explorer-style GUI that authenticates with keys, it will stop working against accounts that have local auth disabled. The Azure portal's built-in Data Explorer mostly handles this correctly now — it authenticates using your signed-in Entra ID identity, assuming you've granted yourself the data plane roles. Third-party tools vary. You'll need to migrate those tools to Entra ID or move to ones that already support it. Small transition cost for a meaningfully better posture. Worth paying.
With disableLocalAuth = true, your Cosmos account is genuinely a zero-key environment. Every request is authenticated through Entra ID. Every identity has a named, auditable, revocable role assignment. The primary key in the portal still exists but it's functionally decorative — nobody can actually use it to do anything. This is the destination the rest of this chapter has been pointing at.
Same move you made in SQL Server twenty years ago. Same idea. Different era. Same good instinct.
A Quick Summary for Reference
If you're scanning back through this chapter in six months trying to remember how to do the thing, here's the compressed version.
Control plane — account, database, container, indexing policy, throughput. Assigned through standard Azure RBAC via the portal's IAM blade, or via az role assignment create. Your running application almost never needs this.
Data plane — document operations. Assigned through Cosmos-specific RBAC via az cosmosdb sql role assignment create. Your running application needs this. The portal doesn't surface data plane roles — you'll use the CLI (or Bicep, or Terraform) instead. This is by design, not a bug in your setup.
Default data plane roles:
- Reader:
00000000-0000-0000-0000-000000000001 - Contributor:
00000000-0000-0000-0000-000000000002
The one config flag: UseDefaultAzureCredential: true in Benday.CosmosDb, or new DefaultAzureCredential() in raw SDK code.
Auditing what's assigned: az cosmosdb sql role assignment list --account-name <acct> --resource-group <rg>. The portal will never tell you; the CLI is the only source of truth. (More in Chapter 14.)
Reading the error message: If the 403 names Microsoft.DocumentDB/databaseAccounts/readMetadata, your identity is missing the basic data plane role entirely — the SDK handshake is what's failing, not whatever your code was actually trying to do.
Locking the door: disableLocalAuth: true on the account rejects all key-based authentication outright. Apply it via Bicep, ARM, or az resource update. Azure Policy has a built-in policy to enforce it across a subscription. This is the "we're done with keys" setting — the Cosmos version of turning off SQL Server password auth once Integrated Security was working.
The mindset: Managed identity in production, az login locally, no primary keys in config files anywhere, ever, once you've moved past the emulator. Deployment automation creates the schema. The running app touches data. Neither can do the other's job.
Next up: Chapter 10, where we pull it all together. The cocktail app on drinkymcdrinkface.com is a complete production Cosmos DB application — three entity types sharing a single container, multi-tenancy done right, traditional search that doesn't need AI, and all of it running on the patterns we've been building since Chapter 1. Hierarchical partition keys, aggregate roots, denormalization, the library, and now managed identity — all in one running system, solving a problem most database books would tell you is too complicated for a single chapter. We'll prove that it isn't.