I've been working doing a lot more with Azure Web Apps lately and found that there are some basic things that it's hard to find information on. So I decided to write some labs. This is the fourth post in a series.
The overall goal of these labs is to teach you how to create an application that runs inside of an Azure Web App. While this isn’t all that difficult, there are a fair number of steps. This fourth lab will change the Azure Web App’s security so that some of the application allows anonymous access and some requires authenticated access.
As of the end of Lab 3, if you visit your Azure Web App at {{App Service URL}}, every user will be prompted to log in using username and password before accessing any resources in the app. We’re going to modify that so that only certain parts of the ASP.NET MVC Core application (only certain Views) require a login.
Here's a link to the PDF version of this lab.
Here are the labs in this series: Lab 1, Lab 2, Lab 3, Lab 4, Lab 5
Terminology
The Portal uses a user interface concept that tends to expand horizontally towards the right. Every time that you choose something, rather than popping open a dialog box, it creates a new panel of in the user interface. These panels are called blades. I’ll be referring to UI blades through this lab.
Variables
A lot of the resources that you create in this lab are going to need unique names. When I say unique, I mean that they’re going to need to be unique for Azure and not just fun and creative. Since I can’t possibly know which values that you’re going to need to choose, I’m going to give you the list of these values now and let you choose them. I’ll refer to these as “variables” throughout the lab and when I refer to them, I’ll put them in squiggle brackets like this – {{Variable Name}}.
| Variable Name | Description | Your Value |
| {{App Name}} | This is the name of your application in Azure. This will eventually turn into the URL for your application. For example, if my App Name is ‘thingy123’ application URL that azure generates will be https://thingy123.azurewebsites.net. | |
| {{Resource Group}} | This is the name of the Azure resource group. | |
| {{App Service URL}} | This is the URL for your web app. This value is generated for you by Azure. | https://{{App Name}}.azurewebsites.net |
Open the Sample Solution
For this lab, you’re going to use a simple ASP.NET MVC Core application that’s in the zip file for lab 3. This code is very simple. It’s not much more than what you’d get if you created a new solution and ASP.NET MVC Core project.
- Locate the zip file for this lab.
- Extract the zip to a folder on your local disk (for example, c:\temp\azure-labs)
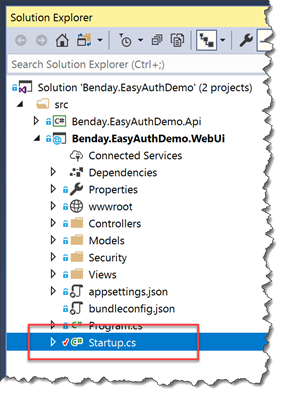
- In the before folder for this lab, open the EasyAuthDemo.sln solution using Visual Studio 2017. When it’s opened, you should see two projects in Solution Explorer.
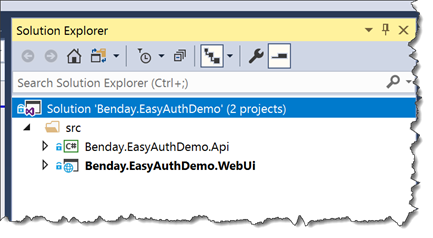
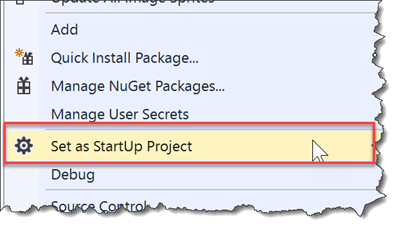
- Let’s make sure that the web project is marked as the start up project. In Solution Explorer, right-click on the EasyAuthDemo.WebUi project. From the context menu, choose Set as StartUp Project.
- If you haven’t already published Benday.EasyAuthDemo.WebUi to your Azure Web Site, publish it now.
Change the Security Settings In Azure to Allow Anonymous
The application has been published to your Azure Web App. Now let’s go change the security settings for the application.
- Open a browser and go to https://portal.azure.com.
- Go to the administration page for your web app ({{App Name}}).
- In the left column of the web app admin page, click Authentication / Authorization.
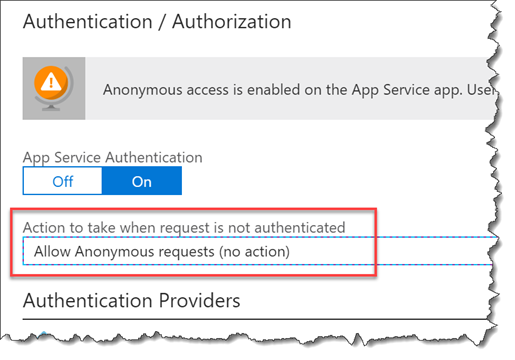
- You should now be on the Authentication / Authorization page and it should look something like the image below.Right now, Action to take when request is not authenticated should be set to Log in with Microsoft Account.
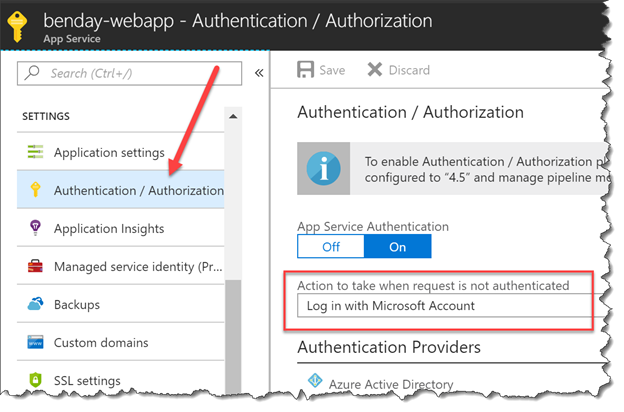
- Change the setting for Action to take when request is not authenticated to be Allow Anonymous requests (no action). Click the Save button.
- Open a browser and go to {{App Service URL}}. Your application in Azure should no longer require a password to view the site.
At this point, you’ve effectively turned off security. Your web app knows how to talk to Microsoft Accounts (MSAs) for security…it just isn’t going to use them because it’s now configured to not care.
We’ve hit the end of what “Easy Auth” (Azure App Authentication) can do by itself. We’re going to need to make some code changes in our application.
Modify the ASP.NET Core MVC App to Know About Security
Let’s say that the part of our site that we want to restrict (require a username and password) is the About page.
In Visual Studio, go to Solution Explorer.
Navigate to the EasyAuthDemo.WebUi project and expand the Controllers folder. You should see a file in that folder named HomeController.cs.
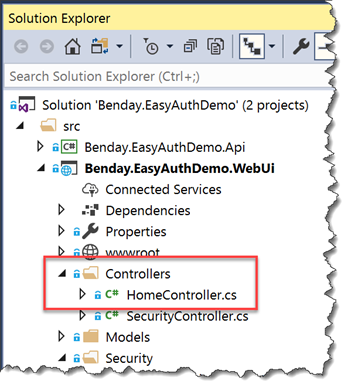
Double-click on HomeController.cs to start editing it.
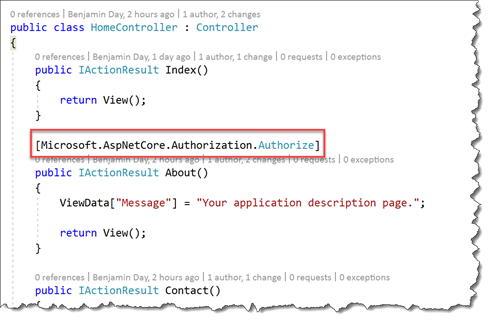
In the HomeController class, locate the About() method.
Just above the About() method definition, add the following attribute: [Microsoft.AspNetCore.Authorization.Authorize]
- Build the solution (Ctrl-Shift-B) and verify that it compiles successfully.
- Publish the application to Azure by doing a Right Click -> Deploy.
- Open a browser and go to your web app at {{App Service URL}}
- In the menu for the website, click on the About link to navigate to the About page.
- You should see an error.
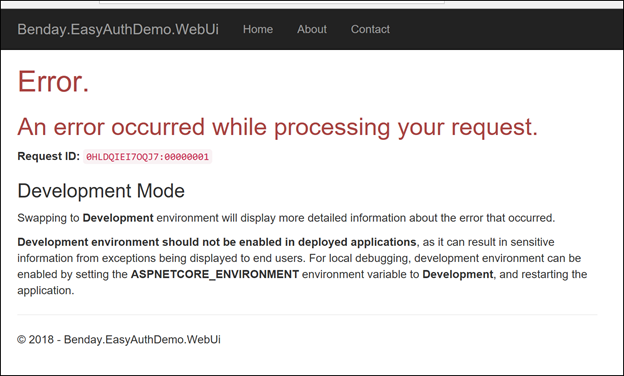
So. Good news and bad news. The good news is that you kept the unauthenticated user out of the super-secret About page. The bad news is that it doesn’t work for anyone.
What we need to have happen is for us to get prompted to log in when the user tries to access a page that requires an authenticated user.
Enable ASPNETCORE_ENVIRONMENT Development Mode
Right now we’re getting an error. The error message isn’t telling us that much because the real error message is being hidden from us because this is (supposedly) a production deployment of our application. Let’s put our Azure Web App in development mode so we can see the error message.
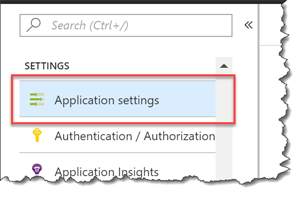
- Go to the Azure Portal and navigate to the admin page for your web app
- Click on Application settings
- On the Application settings blade, scroll down until you see a section called Application settings
- Click the Add new setting In the Enter a name box, type ASPNETCORE_ENVIRONMENT. In the Enter a value box, type Development.
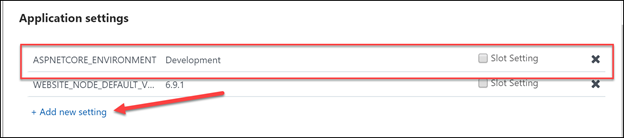
At the top of the blade, click the Save
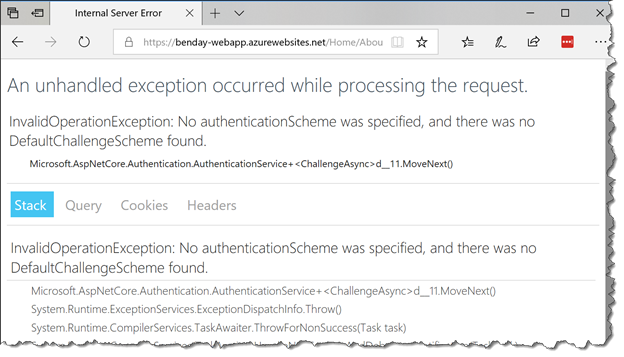
Go back to your web app in the browser ({{App Service URL}) and reload the About page.
You should see a detailed error message that says “InvalidOperationException: No authenticationScheme was specified, and there was no DefaultChallengeScheme found.”
The application is complaining because when it needs to decide if someone is authorized or not, it has no idea how to make that decision. This is because those settings haven’t been added to our ASP.NET MVC Core app yet.
Configure an ASP.NET Core Authentication Scheme & Login Pages
We need to tell ASP.NET Core how to authenticate users and we’re going to need some web pages in our application to handle the flow of authentication.
To make this easier for you and to save you a whole lot of typing, a lot of this code is already been added to the code for the lab. The parts that make that code active have been commented out.
- In Solution Explorer, locate cs. Double-click Startup.cs to open it in the editor.
- In Startup.cs, scroll down until you locate the ConfigureServices() method.Uncomment the line for ConfigureAuthentication(services);
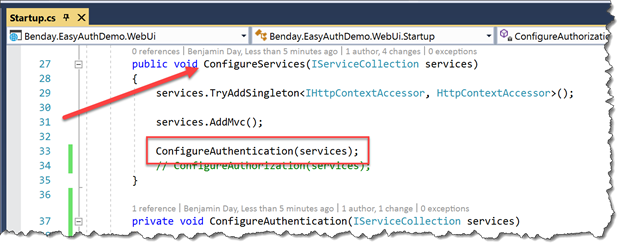
- Scroll down until you can see the ConfigureAuthentication() method.
So what is this code doing? This code adds an authentication scheme for use by ASP.NET Core and configures that scheme. It’s going to use a cookie-based authentication scheme. This means that it will write and read an authentication cookie to decide if you’re logged in.
Since we’re using Azure Easy Auth, we don’t care as much about this auth cookie because the really important auth cookie is the one written by Easy Auth. What we do care about is where we go to kick off the log in and log out process. Those values are specified by options.LoginPath and options.LogoutPath.
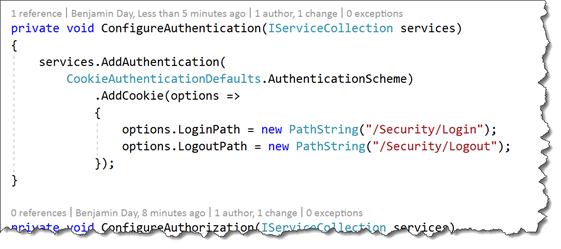
private void ConfigureAuthentication(IServiceCollection services)
{
    services.AddAuthentication(
        CookieAuthenticationDefaults.AuthenticationScheme)
            .AddCookie(options =>
            {
                options.LoginPath = new PathString("/Security/Login");
                options.LogoutPath = new PathString("/Security/Logout");
            });
}
These two paths point to controller code and views that are already part of the lab code.
- In Solution Explorer, locate cs. Double-click SecurityController.cs to open it.
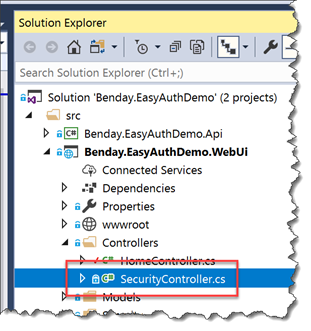
The code for SecurityController.cs is very simple. It’s got no logic in it other than defining a Login() action method that will display a view.
using Microsoft.AspNetCore.Mvc;
using System;
using System.Collections.Generic;
using System.Linq;
using System.Threading.Tasks;
namespace Benday.EasyAuthDemo.WebUi.Controllers {
public class SecurityController : Controller
{
public IActionResult Login()
{
return View();
}
}
}
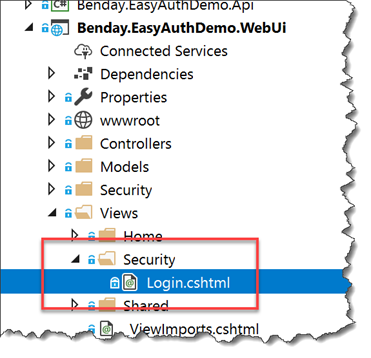
- In Solution Explorer, expand the Views folder and the Security Double-click Login.cshtml.
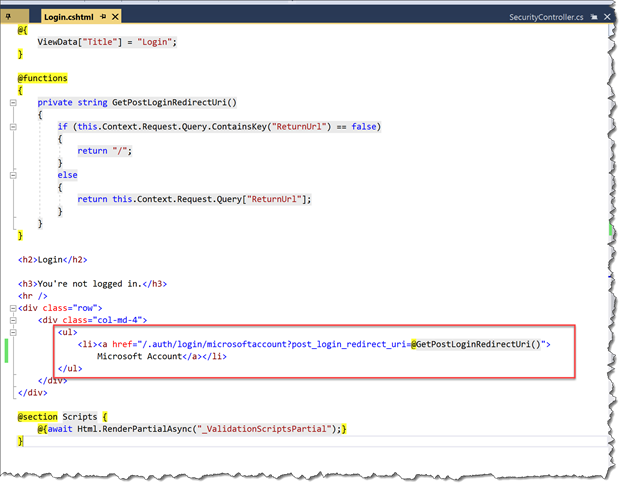
Login.cshtml is the view for the login page. This page has links to Easy Auth’s provider-specific login page for Microsoft Accounts (MSAs).
The URL for that page is /.auth/login/microsoftaccount. This page is automatically added to your site by Azure as part of your Web App.
In the view code, we pick up the ReturnUrl query string variable that ASP.NET Core passes to the login page. That ReturnUrl value contains the path for application URL that triggered the login request. Easy Auth does things a little bit differently and uses a query string variable named post_login_redirect_url so we need to take ASP.NET’s ReturnUrl value and put it on to the login URL as post_login_redirect_url. That’s what’s happening with the @GetPostLoginRedirectUri() call.
Publish your code to Azure using Right-click -> Deploy.
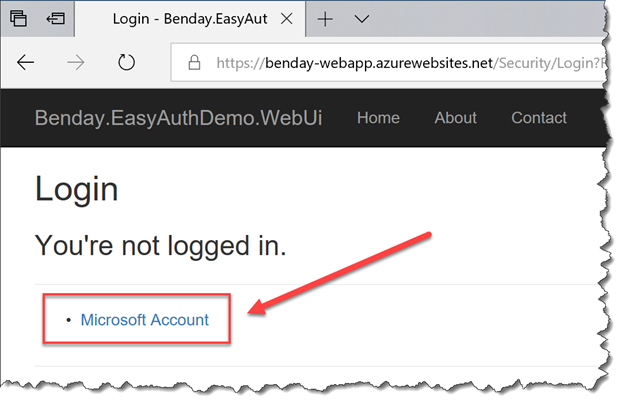
Open a browser and navigate to the About page for your app. It should say that ****You’re not logged in.****Click on the Microsoft Account link to log in with your Microsoft Account.
- If prompted for credentials, log in.
It didn’t work, huh? You’re stuck in a loop.
Don’t panic.
Add Authorization
It won’t give you an error but you’ll keep coming back to exactly the same page saying that you’re not logged in. This is because your app doesn’t know how to decide if you’re authorized.
There are two big pieces to security – authentication and authorization. Authentication describes who you are. Authorization describes what you can do. A while back, you added the [Authorize()] attribute to the About() method of HomeController class. That attribute tells ASP.NET Core that you need to be logged in and that you need to be authorized.
You’re authenticated because you logged in. But you’re not authorized because there’s no logic to decide that you’re authorized.
Let’s add that logic.
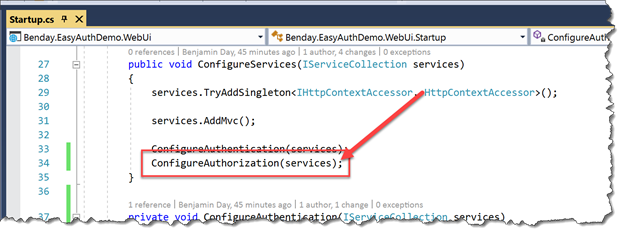
- Go back to Startup.cs and locate the ConfigureServices() method.Uncomment the call to ConfigureAuthorization(services);
So what is the code in ConfigureAuthorization() doing?
This code is setting up an authorization policy in ASP.NET MVC Core. In ASP.NET MVC Core, policies have two pieces: a Requirement and a Handler. In our case it’ll be the LoggedInUsingEasyAuthRequirement and LoggedInUsingEasyAuthHandler.
private void ConfigureAuthorization(IServiceCollection services)
{
 services.AddSingleton<IAuthorizationHandler, LoggedInUsingEasyAuthHandler>();

 services.AddAuthorization(options =>
 {
 options.AddPolicy(SecurityConstants.Policy_LoggedInUsingEasyAuth,
 policy => policy.Requirements.Add(
 new LoggedInUsingEasyAuthRequirement()));

 options.DefaultPolicy = options.GetPolicy(
 SecurityConstants.Policy_LoggedInUsingEasyAuth);
 });
}
LoggedInUsingEasyAuthRequirement implements the IAuthorizationRequirement interface from Microsoft.AspNetCore.Authorization. A requirement can have configuration information related to it but in this case, there’s no configuration required so this class has no code.
using Microsoft.AspNetCore.Authorization;
using System;
using System.Collections.Generic;
using System.Linq;
using System.Threading.Tasks;

namespace Benday.EasyAuthDemo.WebUi.Security
{
 public class LoggedInUsingEasyAuthRequirement : IAuthorizationRequirement
 {
 }
}
The LoggedInUsingEasyAuthHandler is more complex and does actual work of deciding if you’re authorized. This class extends AuthorizationHandler from Microsoft.AspNetCore.Authorization. The decision happens in the HandleRequirementAync() method.
protected override Task HandleRequirementAsync(
 AuthorizationHandlerContext context,
 LoggedInUsingEasyAuthRequirement requirement)
{
 var identityProviderHeader =
 GetHeaderValue(_Accessor.HttpContext,
 SecurityConstants.Claim_X_MsClientPrincipalIdp);

 if (identityProviderHeader == null)
 {
 // not logged in
 context.Fail();
 }
 else
 {
 context.Succeed(requirement);
 }

 return Task.CompletedTask;
}
Azure App Authentication (Easy Auth) adds a handful of headers to each request that describes the current logged in user. One of these headers is X-MS-CLIENT-PRINCIPAL-IDP and it contains a string with the provider that authenticated the user. In our case, it’ll be microsoftaccount but it could be google, facebook, twitter, or aad. HandleRequirementAsync() looks for the existence of this header. If the header exists (you’re logged in), the handler calls context.Succeed() and if the header doesn’t exist (you’re not logged in), it calls context.Fail().
- Publish your code to Azure using Right-click -> Deploy.
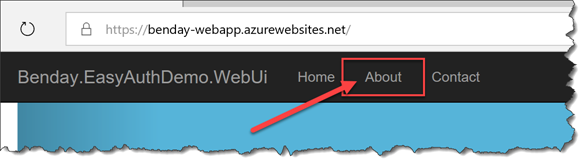
- Open a browser and navigate to the About page for your app.
- If it prompts you to log in, log in using your Microsoft Account.
- You should see the About page and it should look like the following screen.
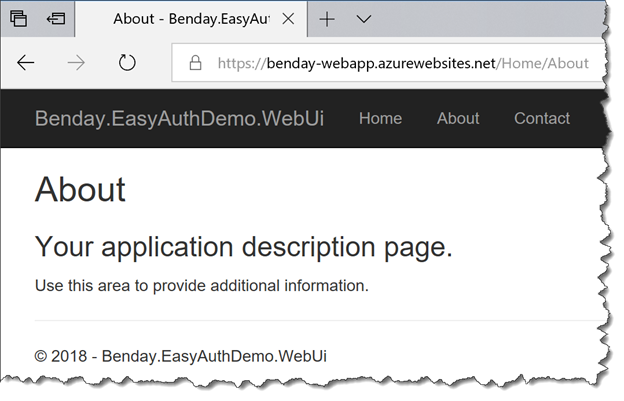
- Just for giggles, navigate to the Home page and Contact page and then back to About.
It worked, right? Congratulations! You’ve got your ASP.NET MVC Core app working with Azure Easy Auth with some pages requiring a login and some pages allowing anonymous access.
Pretty cool, huh?